


10
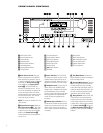
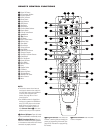
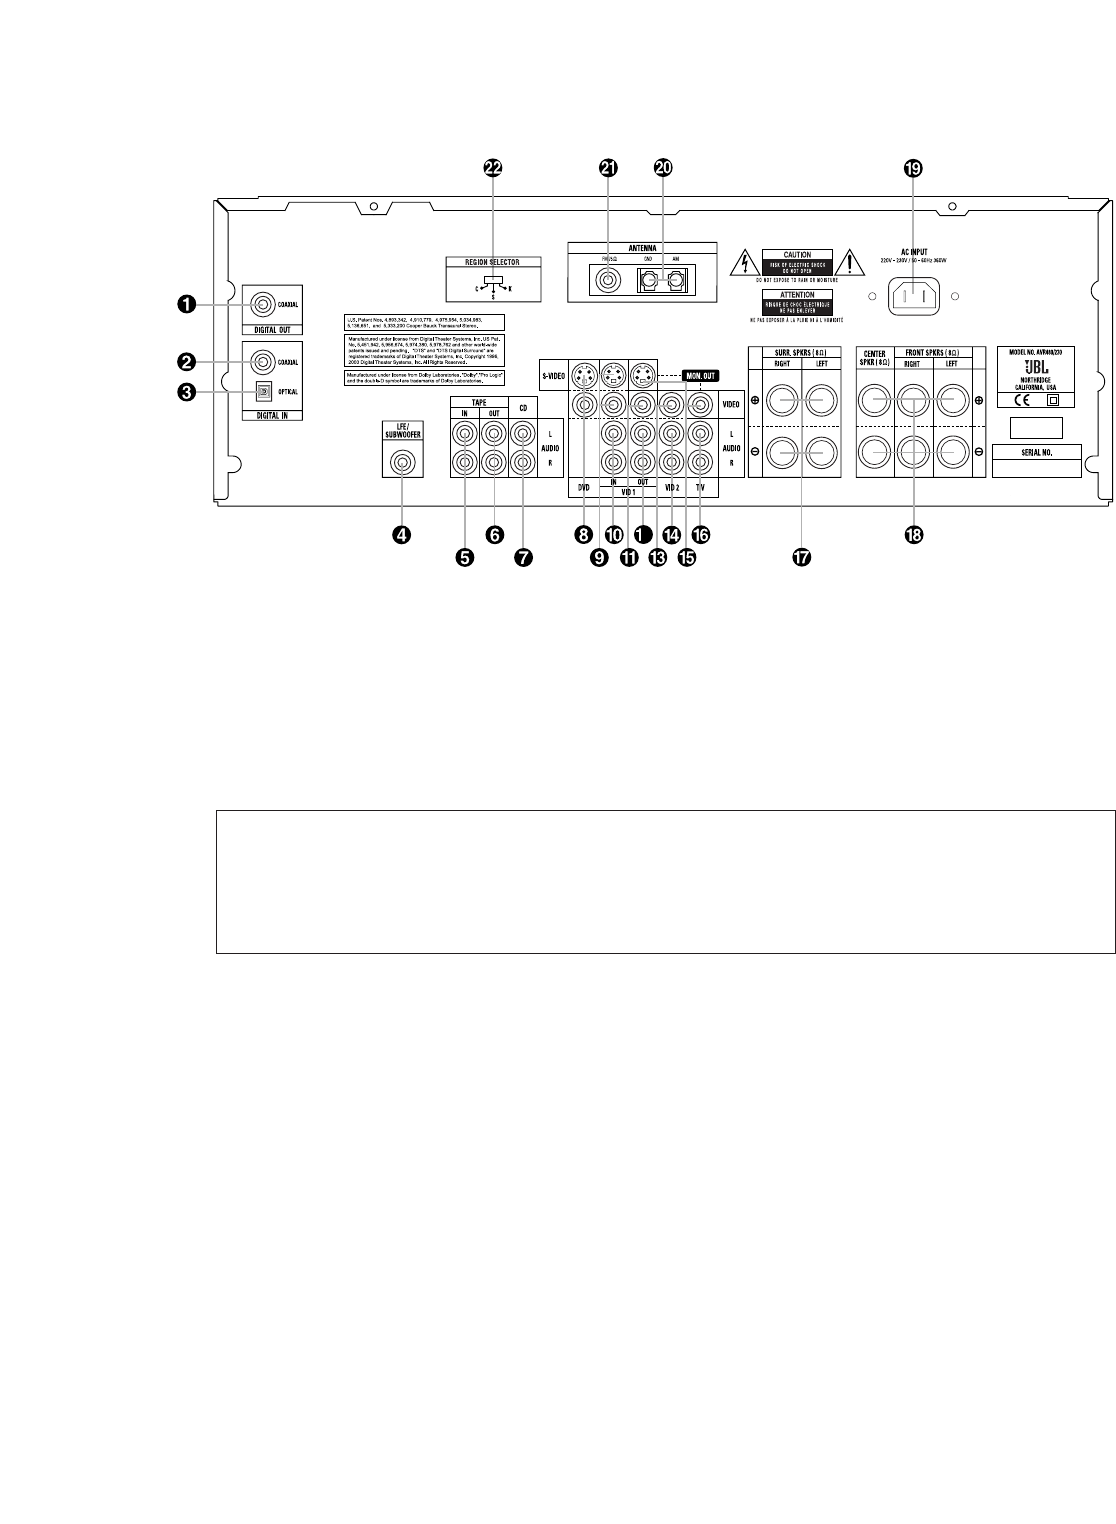
REAR-PANEL CONNECTIONS
0
Coaxial Digital Audio Output
1 Coaxial Digital Audio Input
2 Optical Digital Audio Input
3 Subwoofer Output
4
Tape Inputs
5
Tape Outputs
6
CD Inputs
7 DVD Video Inputs
8 Video 1 Video Inputs
9
Video 1 Audio Inputs
A Video 1 Video Output
B Video 1 Audio Outputs
C Video 2 Video Input
D Video 2 Audio Inputs
E Video Monitor Outputs
F TV Audio Inputs
G Surround Speaker Outputs
H Front/Center Speaker Outputs
I AC Power Cord Jack
J AM Antenna
K FM Antenna
L Region Selector
NOTE: To assist in connecting the
multichannel inputs, outputs and
speakers, all connection jacks and
terminals are color-coded in conformance
with the latest EIA/CEA-863 standards
as follows:
Front Left: White
Front Right: Red
Center: Green
Surround Left: Blue
Surround Right: Gray
Subwoofer: Purple
Coaxial Digital Audio: Orange
Composite Video: Yellow
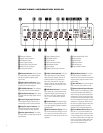
0
Coaxial Digital Audio Output:
Connect this jack to the matching digital
input connector on a digital recorder such
as a CD-R or MiniDisc recorder.
1 Coaxial Digital Audio Input:
Connect the coax digital output from a
DVD player, HDTV receiver, LD player, MD
player or CD player to this jack. The signal
may be a Dolby Digital signal, a DTS sig-
nal or a standard PCM digital source. Do
not connect the RF digital output of an
LD player to this jack.
2 Optical Digital Audio Input:
Connect the optical digital output from a
DVD player, HDTV receiver, LD player, MD
player or CD player to this jack. The signal
may be a Dolby Digital signal, a DTS
signal or a standard PCM digital source.
3 Subwoofer Output: Connect this
jack to the line-level input of a powered
subwoofer. If an external subwoofer
amplifier is used, connect this jack to the
subwoofer amplifier input.
4
Tape Inputs: Connect these jacks to
the
PLAY/OUT jacks of an audio recorder.
5
Tape Outputs: Connect these jacks to
the
RECORD/INPUT jacks of an audio
recorder.
6
CD Inputs: Connect these jacks to
the analog output of a compact disc
player or CD changer.
Note: If your DVD player, HDTV set-top
box, cable box, satellite receiver or other
video source device is equipped with
component (Y/Pr/Pb) video outputs that
are compatible with component video
inputs on your video display, it is recom-
mended that you connect the source’s
component video outputs directly to the
corresponding component video inputs on
the video display. In that case, you only
need to connect the source’s audio out-
puts to the AVR. If you don’t have compo-
nent video connections on your TV or
video display, then see the descriptions
below for connecting the source’s com-
posite or S-Video outputs to the AVR.
7 DVD Video Inputs: Connect these
jacks to the composite or S-Video output
jacks on a DVD player or other video
source.
8 Video 1 Video Inputs: Connect these
jacks to the
PLAY/OUT composite or S-
Video jacks on a VCR or other video
source.
9
Video 1 Audio Inputs: Connect
these jacks to the
PLAY/OUT audio jacks
on a VCR or other video source.
A Video 1 Video Output: Connect this
jack to the
RECORD/INPUT composite
video jack on a VCR.
B Video 1 Audio Outputs: Connect
these jacks to the
RECORD/INPUT
audio jacks on a VCR or any other
Audio recorder.