


25
Volume and Tone Controls and
Headphones
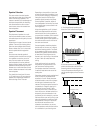
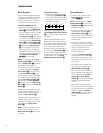
• Adjust the volume to a comfortable
level using the front-panel
Volume
Control
$
or remote Volume
Up/Down
W
buttons.
• To temporarily silence all speaker
outputs, press the
Mute Button
a
.
This will interrupt the output to all
speakers and the headphone jack, but
it will not affect any recording or dub-
bing that may be in progress. Press the
Mute Button
a
again to return to
normal operation.
• To set the output of the AVR480 so
that the output is “flat,” with the Tone
controls deactivated, press the
Tone
Mode Button
6
once or twice so
that the words
TONE OUT appear
momentarily in the
Main Information
Display
K
. To return the tone con-
trols to an active condition, press the
Tone Mode Button
6
once or twice
so that the words
TONE IN momen-
tarily appear in the
Main Information
Display
K
. Once TONE IN is
shown in the Display, press the
Set
Button
^
on the front panel to select
the Bass Control. Adjustments can be
made with the
Selector Buttons
%
on the front panel. Pressing the Set
Button
^
again selects the Treble
Control. Make your adjustments with
the
Selector Buttons
%
.
• For private listening, plug the 3.2mm
(5/8") stereo phone plug from a pair of
stereo headphones into the front-panel
Headphone Jack
4
. Note that when
the headphone’s plug is connected, the
word
HEADPHONE will scroll once
across the
Main Information Display
K
and all speakers will be silenced.
When the headphone plug is removed,
the audio feed to the speakers will be
restored.
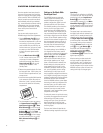
Surround Mode Selection
One of the most important features of the
AVR480 is its ability to reproduce a full
multichannel surround sound field from
digital sources, analog matrix surround-
encoded programs and standard stereo
or even mono programs. In all, a total
of 11 listening modes are available on
the AVR480.
Selection of a surround mode is based on
personal taste, as well as the type of
program source material being used. For
example, motion pictures, CDs or TV
programs bearing the logo of one of the
major surround-encoding processes (such
as Dolby Surround) may be played in
either the Dolby Pro Logic II Movie (with
movies, video or television programs) or
Music (with music) surround mode. When
no rear speakers are in use, the Dolby 3
Stereo mode should be selected with all
surround recordings.
Note that when Dolby Digital 2.0 signals
(e.g., “D.D. 2.0” tracks from DVD) that are
encoded with Dolby Pro Logic information
are received via any digital input, the
Dolby Pro Logic II Movie mode will be
selected automatically (in addition to the
Dolby Digital mode) and will decode a
full-range 5.1-channel surround sound
even from those recordings (see also
“Dolby Digital” on page 26).
To create wide, enveloping sound field
environments and defined pans and fly-
overs with all analog stereo recordings,
select the Dolby Pro Logic II Music or
Pro Logic mode.
NOTE: Once a program has been
encoded with matrix surround informa-
tion, it retains the surround information
as long as the program is broadcast in
stereo. Thus, movies with surround sound
may be decoded via any of the analog
surround modes such as Dolby Pro Logic II,
when they are broadcast via conventional
TV stations, cable, pay TV and satellite
transmission. In addition, a growing
number of made-for-television programs,
sports broadcasts, radio dramas and
music CDs are also recorded in surround
sound. You may view a list of these
programs at the Dolby Laboratories Web
site at www.dolby.com.
Even when a program is not listed as
carrying intentional surround information,
you may find that the Dolby Pro Logic II,
Dolby 3 Stereo and Logic 7 modes often
deliver enveloping surround presentations
through the use of the natural surround
information present in all stereo
recordings.
However, for stereo programs without
any surround information, the Theater,
Hall and 5CH Stereo modes should be
tried (effective particularly with old
”extreme” stereo recordings); for mono
programs, we suggest that you try the
Theater or Hall modes.