


20
The choices available for the subwoofer
position will depend on the settings for
the other speakers, particularly the front
left/right positions.
If the front left/right speakers are set to
SMALL, the subwoofer will automati-
cally be set to
SUB, which is the “on”
position.
If the front left/right speakers are set to
LARGE, three options are available:
• If no subwoofer is connected to the
AVR480, press the
‹› Buttons
C
%
so that SUB NONE appears in
the display. When this option is select-
ed, all bass information will be routed
to the front left/right “main” speakers.
• If a subwoofer is connected to the
AVR480, you have the option to have
the front left/right “main” speakers
reproduce bass frequencies at all
times, and have the subwoofer operate
only when the AVR480 is being used
with a digital source that contains a
dedicated Low-Frequency Effects, or
LFE soundtrack. This allows you to
use both your main and subwoofer
speakers to take advantage of the
special bass created for certain movies.
To select that option press the
‹›
Buttons C % so that SUB (LFE)
appears in the display.
• If a subwoofer is connected and you
wish to use it for bass reproduction in
conjunction with the main front
left/right speakers, regardless of the
type of program source or surround
mode you are listening to, press the
‹› Buttons
C
%
so that
L/R+LFE appears in the display.
When this option is selected, a “com-
plete” feed will be sent to the front
left/right “main” speakers, and the
subwoofer will receive the front left
and right bass frequencies under
80Hz, in addition to the LFE soundtrack
(see above).
11.When all speaker selections have
been made for the input selected,
press the
Set Button
E
^
twice or
simply wait three seconds until the
display returns to the normal mode.
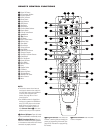
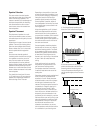
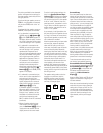
To assist in making these settings, the
icons in the
Speaker/Channel Input
Indicators N will change as the speaker
type is selected at each position. When
only the inner icon box is lit, the speaker
is set for “small.” When the inner and
outer boxes are lit, the speaker is set for
“large.” When no indicator appears at a
speaker location, that position is set for
“none” or “no” speaker.
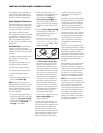
As an example, in the figure below, the
left front and right front speakers are set
for “large,” the center, left surround and
right surround speakers are set for small,
and a subwoofer is enabled.
After the speaker setting has been made
with one input, repeat as described
above with all inputs you will use. In
most cases, the speaker type will be the
same and may be quickly entered by
entering the same data used for the origi-
nal input. But with some music sources
you may prefer to listen to your surround
system without using a center speaker,
particularly when a small center is in
use whose audio performance does not
match perfectly with the main front
speakers. With these sources selected
the center speaker will then be turned off
automatically (enter NONE for the Center
setting), while its signal will be fed to the
left and right fronts.
The speaker setting mode can also be
changed at any time later, and the
AVR480’s memory system will retain
these settings for the input selected,
until they are changed again.
Surround Setup
Once the speaker setup has been com-
pleted, the next setup step is to set the
surround mode you wish to use with each
input. Since surround modes are a matter
of personal taste, feel free to select any
mode you wish – you may change it later.
The Surround Mode chart on page 28
may help you select the mode best suited
to the input source selected. However,
to make it easier to establish the initial
parameters for the AVR480, it is best to
select any Dolby Pro Logic II mode for
most analog inputs and Dolby Digital for
inputs connected to digital sources. In the
case of inputs such as a CD Player, Tape
Deck or Tuner, you may wish to set the
mode to Stereo, if that is your preferred
listening mode for standard stereo
sources, where it is unlikely that surround-
encoded material will be used. Logic 7
Music is also an excellent choice for two-
channel materials, as it is capable of
deriving ambient effects that are normally
present even in two-channel recordings.
To set the surround mode you wish to
use with the input selected, press the
Surround Mode Selector Button
7
on the front panel repeatedly or press the
Surround Mode Selector
9
and the
⁄/¤ Buttons
C
on the remote until
the desired surround mode’s name
appears in the
Main Information
Display
K
.
Note that Dolby Digital and DTS will only
appear as choices when a digital input
has been selected.
After the surround mode setting has been
made with the current input, repeat the
setting with all inputs you will use. The
surround mode can also be changed at
any time later, and the AVR480’s memory
system will retain the settings for the
input selected, until they are changed
again.
LR
C
SL SR
LFE