


50
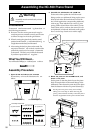
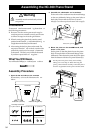
Assembling the NC-500 Piano Stand
Warning
Assembly must be carried out by at least
two persons.
Precautions
To ensure saf e and correct assemb ly, please obser ve
the following precautions.
❏ Be sure to use the correct parts at each step, be
sure that parts are oriented correctly, and be sure
to follow the steps in the order given below.
❏ When lowering the piano body onto the stand,
position hands carefull y so that hands don't g et
caught between the body and the stand.
❏ After setting the body in place on the stand: Do
not press or lean hea vily on the fr ont side of the
piano bod y until you ha ve securel y fastened it
to the stand. The bod y may fall from the stand
if you lean or press in the wr ong place .
What You Will Need…
You will need a Phillips (cr osshead) scre wdriver.
Assembly Procedure
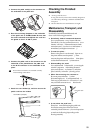
1. Open the box and take out the contents.
Be sure that y ou ha ve all of the items sho wn
below.
Speaker Box
Sideboard A (left side)
Sideboard B (right side)
Pedal Unit
Assembly Accessories
1) 2 piano fasteners
3) 4 screws (M6 × 26)
2) 4 caps
7) 3 cord holders
6) 1 pedal cord
5) 4 flat washers
4) 4 spring washers
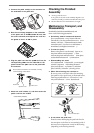
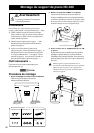
2. Assemble the sideboards and speaker box.
Fit the ends of the speaker box into the metal
fittings on the two sideboards, lining up the screw
holes at both sides. Be sure that each end of the
box is flush against the corresponding sideboard,
with no gap. Then take the four screws (3), set a
spring washer (4) and then a flat washer (5) onto
each of these screws, and use the screws (two for
each sideboard) to fasten the sideboards to the speaker
box.Cover the top of each screw with a cap(2).
2
3,4,5
3
5
4
2
3,4,5
Sideboard A
(left side)
Sideboard B
(right side)
Speaker Box
Gap.
Set the speaker box so that the speaker cord is at the top.
No gap.
Right
Wrong
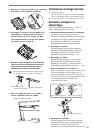
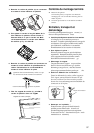
3. Mount the piano on the assembled stand, and
fasten it into place.
Set the piano so that the plastic feet on the piano
body fit into the holes in the metal fittings of the
sideboards. Then fasten the piano body into place
from the bottom with the two piano fasteners(1).
Set the piano into place slowly and carefully,
taking care not to drop it. When lowering the
piano, position hands carefully so that they don’t
become caught between the piano and the stand.
Piano fastener
Piano fastener