


14
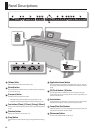
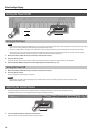
Attaching the Music Rest
The music rest of the HPi-6F contains an LCD screen.
Attach the music rest as explained below, being sure to handle it with
care.
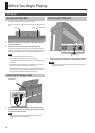
Screw Screw View from rear
1. Remove the music rest screws that are attached to the top
panel (two locations).
2. Fasten the music rest using the screws you removed.
Use one hand to support the music rest, and use your other hand to
tighten the screws. When attaching the music rest, support it securely
so that you don’t drop it. Take care not to get your ngers pinched.
NOTE
• Don’t apply excessive force to the music rest.
• Use only the included screws to attach the music rest.
• To avoid accidents, be sure to remove the music rest before moving
the HPi-6F.
• Be careful not to lose the screws used to fasten the music rest, or
allow small children to accidentally swallow them.
• Completely remove the screws from the top panel before attaching
the music rest. The top panel may be scratched if you attach the
music rest without completely removing the screws.
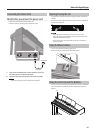
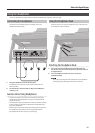
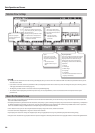
Connecting the Display Cables
Analog RGB
Display Out
Backlight
Analog RGB cable /
Backlight cable
1. Connect the music rest’s RGB cable and backlight cable to
the Analog RGB connector and Backlight connector located
on the HPi-6F’s bottom panel.
NOTE
Make sure that the power is turned o when you connect the
analog RGB cable and backlight cable.
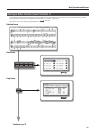
Connecting the Pedal Cord
Pedal Cord
1. Plug the pedal cord extending from the stand into the Pedal
connector located at the rear of the HPi-6F’s bottom panel.
NOTE
You must connect or disconnect the pedal cord while the HPi-6F’s
power is switched o.
Before You Begin Playing
Setting Up