


29
Rehearsing Punch-in
(Insert) recording
Storing the punch-in and
out points into memory
Rehearsal and Auto In/Out Procedures
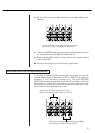
You can rehearse your punch-in as many times needed without
affecting the existing recording. During rehearsal, what you hear in
the monitor mix and read on the level meters will be the same as
during recording, but signal won't be recorded on tape.
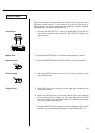
1. Cue the tape up a few seconds before you reach the expected
punch-in point.
2. Press the REHEARSAL switch. The "RHSL" indicator will start
blinking in the display.
3. Press PLAY to start playing ("preroll"). The "START" indicator will
glow on the display. The counter readout at which the key was
pressed is stored as the START point. The MEMO 1 or 2 indicator
turns off (if it was lit).
4. When you reach JUST BEFORE the error, press RECORD to start
recording (punch in). The "IN" indicator will glow on the display
and an LED will start flashing above the RECORD button. The
counter readout at which the key was pressed is stored as the
PUNCH-IN point.
5. When the tape reaches the expected punch-out point, press PLAY.
The "OUT" indicator will turn on, and the "IN" indicator and the
LED above the RECORD button will turn off. The counter readout
at which the key was pressed is stored as the PUNCH-OUT point.
6. The tape will play for about 3 seconds ("postroll"), then will
automatically rewind, stopping at the START point. The "RHSL"
indicator that was blinking will glow solid in the display.
7. Press PLAY (or REPEAT if you want to practice the performance
over and over again, continuously). When the tape reaches the
preset punch-in point, the monitor will switch from tape to "live"
instrument on the punch-in track (in our example, on track 2).
The RECORD LED will blink to indicate that you are "rehearsing"
punch-in recording, not actually recording.
Rehearsal