Editing Programs: Chapter 6
QSR Reference Manual 16
AMP/RANGE
The Amp/Range function lets you control the velocity and keyboard range of each
sound layer.
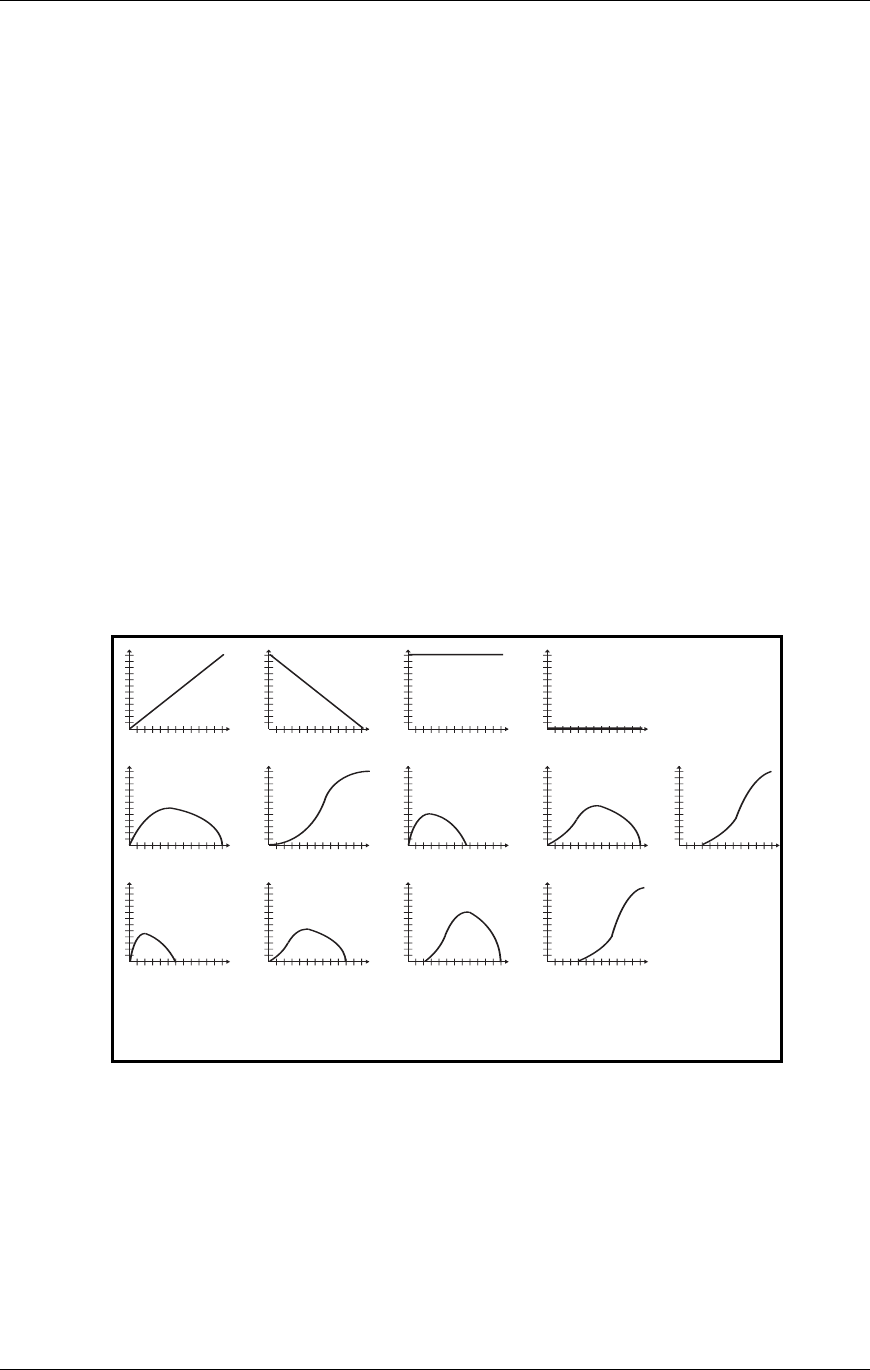
Velocity Curve (13 choices) Page 1
This selects how the sound will respond to the dynamics of your playing the
keyboard. A LINEAR curve is the norm, whereby the increase in level is equal to the
increase in velocity; the velocity values increase as you play harder. Many of the
Velocity Curves make up sets to be used by 2, 3 or 4 sounds in order to facilitate
velocity crossfading, whereby a different sound is played depending on how hard or
soft the keyboard is played.
As explained earlier, many of the samples to choose from when assigning voices are
already velocity switching. These samples usually have the word “Velo” or the letter
“V” in their names, indicating that there is actually more than one sample per note
which can be selected by how hard or soft each note is played. However, the velocity
point at which these sounds change is fixed and cannot be altered. If you want to
create your own velocity crossfading Program, assign the single-sample versions of
the same samples (“MarimbaVel” is made up of “Marimba Hd” and “Marimba Sf”)
to two or more sounds, then use the appropriate velocity curves for each sound (in a
three-way velocity split, sound 1 would use curve “1 of 3,” sound 2 would use curve
“2 of 3” while sound 3 would use “3 of 3”).
0
99
0 127
L
E
V
E
L
VELOCITY
LINEAR
0
99
0 127
L
E
V
E
L
VELOCITY
INVERTED
0
99
0 127
L
E
V
E
L
VELOCITY
MAXIMUM
0
99
0 127
L
E
V
E
L
VELOCITY
MINIMUM
0
99
0 127
L
E
V
E
L
VELOCITY
1 OF 2
0
99
0 127
L
E
V
E
L
VELOCITY
2 OF 2
0
99
0 127
L
E
V
E
L
VELOCITY
1 OF 3
0
99
0 127
L
E
V
E
L
VELOCITY
2 OF 3
0
99
0 127
L
E
V
E
L
VELOCITY
1 OF 4
0
99
0 127
L
E
V
E
L
VELOCITY
2 OF 4
0
99
0 127
L
E
V
E
L
VELOCITY
3 OF 4
0
99
0 127
L
E
V
E
L
VELOCITY
4 OF 4
0
99
0 127
L
E
V
E
L
VELOCITY
3 OF 3
Aftertouch Depth (-99 to +99) Page 2
At +00, aftertouch has no effect on the amplitude. Applying aftertouch with this
parameter set to a positive value raises the amplitude; conversely, applying
aftertouch with a negative value will make the sound softer the harder you press.
The higher the number (either positive or negative), the greater the effect for a given
amount of aftertouch.
Use aftertouch to “swell” the amplitude of brass and horn parts.
TIP:


