


46
Chapter 4. Changing the settings of a sample
Adjusting the BPM (tempo)
of a sample
1. In the Play screen, press [BPM ADJUST].
2. Use the VALUE dial to specify the BPM (tempo).
Play BPM 40.0–200.0
The top line displays the original BPM (tempo).
You can also press CURSOR [→] to make adjustments in
0.1 BPM units.
* The sample BPM can be adjusted in a range of 0.5–1.3 times.
If the synchronized BPM exceeds the allowable range of the
sample BPM, the sample BPM will be doubled or halved to
stay within the allowable range.
* If the sample is shorter than approximately 200 ms, changes in
BPM will not be reflected.
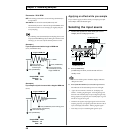
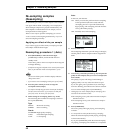
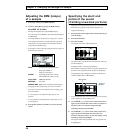
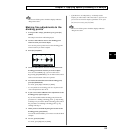
fig.04-01c
PAD#: Currently selected pad number
(Example) USER1-1:
Pad [1] of user bank 1
GRADE: Sampling grade (stereo/mono)
STD (Standard), LONG, LO-FI
PLAY TYPE: PHRASE, SINGLE
REVERSE: ON, OFF
SAMPLE BPM: BPM of the currently selected sample
* Changing the BPM (tempo) may cause noise to be heard.
* If you want to return to the BPM used when sampling, press
[F1] (INIT BPM).
* It is not possible to set Play BPM if Play Type is set to
SINGLE.
* It is not possible to set Play BPM for a sample that is set to
reverse playback.
3. Press [EXIT], [SONG], or [PTN] to return to the Play
screen.
Specifying the start/end
points of the sound
(Omitting unwanted portions)
* While you are setting the start/end points of a sample, the Play
BPM setting is ignored, and the sample will play at its
original BPM (tempo).
1. Press the pad of the sample whose start/end points you
want to change.
2. Press [WAVE EDIT].
3. Press [F1] (LOOP).
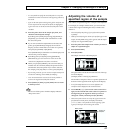
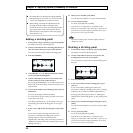
The sample waveform will be displayed.
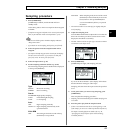
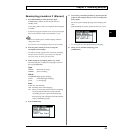
fig.04-02a
The pad number will be shown at the left side of the top
line of the display.
(Example) PAD 6-1: Pad [1] of pad bank 6
The number of samples of the wave pointer position will
be shown in the right side of the top line of the display.
The beginning of the sample waveform is indicated as
<TOP>, and the end as <BOTTOM>.
fig.04-02b
* Even if a sample has been set to reverse playback, the waveform
will be displayed in the normal direction.
4. Use CURSOR [←][→] to move the entire screen left or
right, use the VALUE dial to move the wave pointer to
the point where you want the sample to begin
sounding, and press [F1] (START).
5. Use CURSOR [←][→] to move the entire screen left or
right, and use the VALUE dial to move the wave
pointer to the point where you want the sample to stop
sounding, and press [F2] (END).
The region between the playback start/stop points will
be highlighted.
Wave Pointer
Number of
Samples