


51
6
6
Chapter 6. Applying special processing to a sample
Dividing a sample into
individual notes (Chop)
The SP-505’s “Chop” function divides a sample at each of the
attacks in the sample waveform, and assigns each divided
sample to a pad.
For example, a drum phrase can be divided into samples
containing separate rhythm instruments such as “bass
drum,” “snare,” and “hi-hat.”
* It is not possible to divide a sample from one of the Chop
banks.
* It is not possible to divide a stereo sample.
* Phrases that contain numerous notes or simultaneously
sounding notes may not be divided as you expect.
* Even if you have an effect applied when you execute “Chop,”
that effect will not be added to the divided samples.
The divided samples will be assigned to the thirty-two
pads of pad banks 13–14 (“Chop banks 1–2”).
* The sample will be divided into samples for a maximum of 32
pads, starting at the beginning of the original waveform. The
rest of the waveform will not be assigned to pads.
* All of the remaining sound will be assigned to the last-divided
sample.
* The start/end point settings of sample are ignored.
1. Press the pad of the sample that you want to divide.
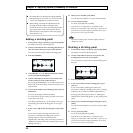
2. Press [CHOP].
fig.06-01
3. Use the VALUE dial to specify the detail
(RESOLUTION) with which the sample will be
divided.
Higher settings will cause the sample to be divided into
smaller pieces.
4. To execute the division at the resolution you specified
in step 3, press [F1] (EXECUTE).
To cancel, press [F2] (CANCEL) or [EXIT].
* If you press [F3] (CANCEL) while the display indicates
“Processing Data...,” the operation will be aborted.
Pads [1]–[16] will light automatically, and the divided
samples will play back.
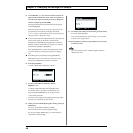
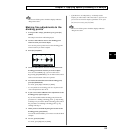
A message will ask whether you want to save the
divided samples.
fig.06-02
5. To save, press [F1] (YES).
To cancel, press [F2] (NO) or [EXIT].
* If pad banks 13–14 (Chop banks; p. 29) already contain
samples, you will be asked “OK to Overwrite?” If you are sure
you want to overwrite the samples of pad banks 13–14, press
[F1] (YES). To cancel, press [F2] (NO).
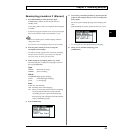
Never turn off the power while the display indicates
“Keep Power On!”
Editing the points at which
the sample is divided
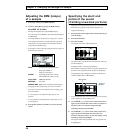
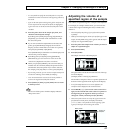
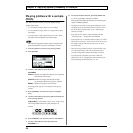
About the dividing point adjustment screen
fig.06-03
The location of the wave pointer is the currently selected
dividing point.
CHOP1–32
This indicates the number of the divided sample that is
currently selected.
● By turning the VALUE dial you can move to the
previous or next dividing point.
You can also press a pad to move to another
dividing point.
● By pressing CURSOR [←][→] you can move the
waveform display area horizontally.
● By pressing [ZOOM IN][ZOOM OUT] you can
zoom-in or zoom-out on the waveform.
Dividing PointWave Pointer