


16
As mentioned earlier, with ASIO direct monitoring, the audio software will take control over the Ozonic mixer’s input channels. With manual
direct monitoring, you must control the Ozonic mixer’s input channels manually. Here’s how:
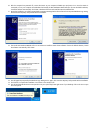
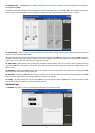
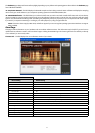
1. Open your audio software and the Ozonic Control Panel.
2. In the Ozonic Control Panel, click the
mixer tab. (Let’s assume that we’re monitoring with the analog Line Inputs 1 and 2.) Assign
the analog in 1/2 channel output routing to Output 1/2, and bring up the channel’s faders until you begin to hear the source that is
connected to the line inputs.
3. Use the Direct Monitoring Level knob on the Ozonic to raise or lower the direct monitor signal that is being sent directly to the
outputs.
4. Please note that the Input signal will also be sent to the FireWire bus and the host software application at the same time as the direct
monitor signal is sent to the Outputs. This will allow you to record and monitor in real time.
The advantages to this type of monitoring are obvious (very low latency), though the inability to add effects can be seen as a drawback. You
will also find that it helps to take the time to get the correct level adjustment between the Input channels in the driver control panel and the
hardware level knob.
General Recording Instructions
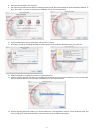
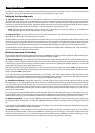
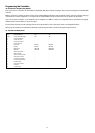
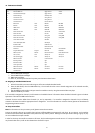
Ozonic’s analog inputs will appear as inputs in your audio software. Depending on your application of choice, these may be labeled as ASIO,
WDM, or CoreAudio inputs, and may be shown as either mono or stereo inputs. For example, in an ASIO-based application (e.g., Cubase or
Nuendo,) the Ozonic’s inputs will appear as:
< Ozonic Analog Input 1
< Ozonic Analog Input 2
< Ozonic Analog Input 3
< Ozonic Analog Input 4
The above driver devices correspond to their respective hardware inputs on the Ozonic, and their naming is designed to reflect that. Choose
an available track in your audio software and route the input signal to it. To do this, select the input source for the track and enable it for
recording. Refer to your audio software’s documentation for further information.
Setting the Sample Rate
In most cases, you will want to set the sample rate from within your audio software. This is covered in more detail in the “Hardware Page”
section, and in “Setting Up Your Record Levels.”
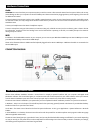
MIDI Functions
Keyboard and MIDI
< Introduction
Before you begin exploring the MIDI section of the manual, please refer to the beginning of this guide and read the Ozonic installation
information that applies to your operating system. It is necessary to install the Ozonic and ensure it is working properly before you begin to
work with the MIDI functions.
< Testing Your Ozonic with Your Computer Software
We also recommend that you verify that your software application is properly communicating with the Ozonic keyboard. Most software
applications have a MIDI Input indicator. To confirm data is received, press any key on the keyboard.
If you encounter any issues or the software receives no data, please verify that you have selected the keyboard’s driver as the MIDI Input for
your software. In addition, please read the troubleshooting section at the back of this manual and consult the manual that came with your
software for proper configuration within the software application.
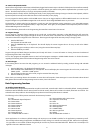
< Edit Mode
This manual will frequently refer to the “Edit mode.” Edit mode defines the state of the
Ozonic when the EDIT button has been pressed.
In Edit mode, the Ozonic’s keyboard is used for selecting functions. These functions are listed above each key on the
keyboard. The top octave
of the Ozonic keyboard is used to enable numerical data entry in Edit mode.
When entering numerical values in Edit mode, the LCD display shows the value entered. This value will update as you enter numerical
data.
When the Ozonic enters Edit mode, the function button will light. The ENTER key must be pressed each time the numerical data entry keys are
used to enter a value. This will save that value. To exit Edit mode simply press the EDIT button again, the LED will no longer be lit and you will
have restored the keyboard
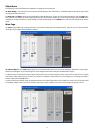
Basic Operation of Ozonic’s MIDI interface
< Setting the Global MIDI Channel
Ozonic can transmit on any of the standard 16 MIDI channels. If you are using a computer-based system, the software usually controls the
routing of MIDI signals.