


24
When you press the CTRL ASGN key and a Group A controller is selected, the MIDI message you assign to the Group A controller will apply to
all the Zones that are active at that time. This means the MIDI CC you have assigned to the Group A controller will be transmitted on all the
channels the selected Zones were assigned to.
To prevent the Group A controller from transmitting on more than one Zone, assign the Group A controller to “OFF”. This will prevent the Group
A controller from having an affect on any of the other Zones.
This method allows you to assign the Group A controller to certain Zones, independent of the Zone’s channel. If you do not want a Group A
controller to affect certain Zones:
1 Select the desired Group A controller.
2 Press the EDIT button, followed by the CTRL ASGN key.
3 Press the ZONE/GRP button and make sure that only the Zones you DON’T want the controller to affect are selected.
4 Enter “0” to select OFF.
5 Press Enter, then Press the Octave Down key
Note: If a Zone is not enabled, the Group A controller will NOT transmit the data that is assigned to that Zone.
< Group Recall/Store
Ozonic’s controllers are grouped into Groups A, B and C.
To make it more clear which group a controller belongs to, the controller has been given a letter and a number. The letter represents the
group the controller belongs to.
When you press STORE or any memory button, you will see the LCD flashing the group symbols that are set to be overwritten. You can change
which groups you want to affect by pressing the ZONE/GRP SELECT button and selecting only groups you want to edit/recall.
Note: Because Group A contains all the Zone information as well, Group A must be active to store or recall any Zone setups.
Important Note: Always check the active groups before pressing the STORE button. Otherwise you might not store all of your controller
assignments.
Example 1: If you want to store only the faders to a preset:
1. Press the ZONE/GRP SELECT button and press the desired Group button (this will de-select all other groups that were enabled
previously). You should then see only Group C flashing on the LCD display.
2. Press STORE.
3. Enter the number of the preset that you want to store the fader assignments to.
Example 2: If you want to recall only the Zone settings of a preset:
1. Press the ZONE/GRP SELECT button and press the desired Group button (this will de-select all other groups that were enabled
previously). You should then see only Group C flashing on the LCD display
2. Press STORE. You should then see only Group A flashing on the LCD display.
3. Enter the number of the preset that you want to store the Zone settings to.
< Limiting the Range of the Controls
Normally, the range of a MIDI controller is 0 to 127. It is possible to limit the maximum and minimum in this range.
1. Press the EDIT button, followed by the DATA 2 (MIN) key. The LED will display the current minimum limit of the controller.
2. Type in the minimum desired value using the numerical data entry keys.
3. Press the ENTER key to confirm. The controller’s CC assignment will be displayed on the LCD.
4. Press the DATA 3 (MAX) key. The LCD will display the current maximum limit of the controller.
5. Type in the maximum value using the numerical data entry keys.
6. Press the ENTER key to confirm.
It is possible to limit the range of any rotary dial, the fader, or the Pitch Bend and Modulation controls. The buttons and the pedal can be set
to decrement or increment between two limits. To do this:
1. Press the EDIT button, followed by the CTRL ASGN key.
2. Enter “153” for decrement or “154” for increment.
3. Press the ENTER key to confirm.
4. Press the DATA 1 key.
5. Enter the value of the MIDI CC you want the button to send out.
6. Press the ENTER key to confirm.
7. Enter the limits as described above.
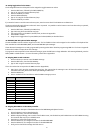
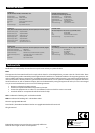
Group A:
< Pitch Bend wheel
< Modulation wheel
< Aftertouch strip
< 5 Transport buttons
< Sustain pedal (not included)
< Expression pedal (not included)
< All settings for the 3 Zones
Group B:
< 8 rotary dials
Group C:
< 9 faders
< 9 buttons below the faders