


18
< Sustain and Expression Pedals
Ozonic will use any polarity foot switch (not included) that is plugged into the Sustain input on the back of the keyboard. Ozonic will automatically
detect the correct polarity on power up. If you want to reverse the polarity, just make sure the pedal is depressed when you switch on your
Ozonic. The Volume input allows you to plug in an Expression pedal (not included).
The Sustain pedal is normally used for sustaining the sound you are playing without having to keep your hands on the keyboard, while the
Expression pedal is normally used to affect the volume of the instrument you are playing.
You can program the Sustain pedal to send out MIDI notes so that you can trigger samples on different MIDI channels. You can also send
Program Changes or any other MIDI messages that can be sent from the 14 assignable MIDI buttons on your Ozonic.
The Expression or Volume pedal can be assigned to control pan, pitch bend sensitivity, tuning, portamento, or any other MIDI message
that can be sent from the nine assignable faders, or eight rotary dials. Once again, the 2 foot pedals and the Expression pedal can have a
different MIDI assignment for each Zone.
For more information, please refer to the “Programming the Controllers” section later in this manual.
< Program Changes
You can send out a Program Change message to any sound card, sound module, instrument or other MIDI device that will receive this
standard MIDI message. The Program Change will be sent on all active Zones. This means that the Program Change will be sent to all
channels that have been configured for the active Zones. These Program Changes will be sent every time you change a preset.
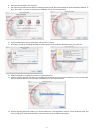
1. Press the EDIT button.
The keyboard will enter Edit mode.
2. Press the PROGRAM key on the keyboard. The LCD will display the current Program value to be sent, as well as the “PROG”
symbol.
3. Type in the program number you wish to send, using the numerical data entry keys.
4. Press the ENTER key to confirm.
Program Changes and Bank Changes (see below) work closely with Zones. For more information on Zones, please see the Advanced
Programming section later in this manual.
You can also program the assignable buttons to send out fixed program messages to individual MIDI channels. For further information
regarding this method, please see the Advanced Programming section later in this manual.
< Bank Changes
If the receiving device has more than 128 programs, you can access the additional banks by sending out Bank Change LSB and MSB
messages.
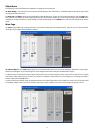
1. Press the EDIT button. The keyboard will enter Edit mode.
2. Press the BANK LSB or BANK MSB key on the keyboard. The LCD will display the current Program value to be sent, as well as the
“BANK’’ symbol and “LSB” or “MSB” symbol.
3. Type in the Bank number you wish to send, using the numerical data entry keys.
4. Press the ENTER key to confirm.
Please check your receiving device’s documentation to ensure that it will respond to these messages. For more information about LSB and
MSB, please refer the Advanced Programming Functions section, later in this manual.
Basic Programming Functions
< Recalling Presets/Memories
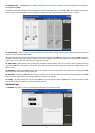
Ozonic has 20 factory-programmed presets that are split into two banks, named A and B. Bank A is selected by default. Pressing the BANK
A/B button switches between the two memory banks and the 10 memory buttons will correlate to that bank, either bank A or bank B. The
selected bank is always visible on the LCD display except when the Zone/Group Select button is activated.
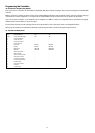
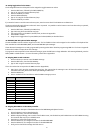
The following is a list of all the presets contained in the 20 memory locations:
* Some applications do not have any default settings and require you to set the MIDI controllers for the application’s parameters yourself.
This normally involves setting the application into MIDI Learn mode, clicking on a controller and moving the dial. With such an application,
it is a good idea to use controller numbers that generally do not have any function associated with them. Ableton Live is an example of an
application that uses a MIDI Learn feature.
A1 = GM
A2 = XG/GM2 with layered keyboard
A3 = Reason Mixer
A4 = Reason Malstrom
A5 = Reason Subtractor
A6 = Reason NN-19
A7 = Reason Dr-Rex
A8 = Reason Re-Drum
A9 = Reason Effects set
A10 = Undefined MIDI CC’s Bank 1
B1 = GM 3 track Mixer with 3 active voices.
B2 = sequencer control setup
B3 = NI B4
B4 = NI Pro 53
B5 = Steinberg PPG Wave 2V
B6 = Steinberg Halion
B7 = G-Media Oddity
B8 = AAS Lounge Lizard
B9 = Rebirth
B10= Undefined MICI CC’s Bank 2