


25
< Setting Toggle Values for the Buttons
The 14 assignable buttons and the pedal can be assigned to toggle between two values.
1. Press the EDIT button, followed by the DATA 2 (MIN) key.
2. Type in “15” using the numerical data entry keys.
3. Press the ENTER key to confirm.
4. Press the DATA 3 (MAX) key.
5. Type in “74” using the numerical data entry keys.
6. Press the ENTER key to confirm.
If you want the button to send the same value every time, enter the same value for both Minimum and Maximum.
The above method will toggle the button value each time it is pressed. It is possible to set the button to send one value when you pressed,
and another value when released.
1. Press the EDIT button, followed by the DATA 1 key.
2. Type “146” using the numerical data entry keys.
3. This sets the button up for MIDI CC (On/Off) mode, as shown in Appendix B.
4. Press ENTER to confirm.
5. Assign the two toggle values for press (DATA 3) and release (DATA 2) as described above.
< RPN/NRPN, GM 1&2 SysEx and Other Messages
The standard MIDI controller numbers range from 0 to 127. The list of MIDI CC’s that can be assigned to the controllers of the keyboard has
been extended to include RPN/NRPN, MMC, and General MIDI 1&2 SysEx messages.
These advanced messages are as easily programmed by entering values 128 to 154 when programming MIDI CCs. The charts in Appendix
B show which number corresponds to each message.
To program the values required for these advanced messages, press the EDIT button to begin Edit Mode. After entering Edit Mode, press the
DATA 1, DATA 2 or DATA 3 button. For more information, please refer to Appendix B.
< Assigning MMC Control to a Button
1. Select the button you want to control the MMC message.
2. Press the EDIT button, then the CTRL ASGN key.
3. Type in “149” using the numerical data entry keys.
This is the number that corresponds to the MMC instruction (Appendix B)..
4. Next, Type in “127” using the numerical data entry keys. This ensures that the message is set to all device ID numbers. For more
information about this, please read “About SysEx Messages & Device ID.”
5. Press the DATA 2 key.
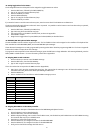
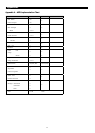
6. Enter a number from the chart below to select the MMC message you want:
Number MMC Command
01 STOP
02 PLAY
03 DEFERRED PLAY
04 FAST FORWARD
05 REWIND
06 RECORD STROBE
07 RECORD EXIT
08 RECORD PAUSE
09 PAUSE
10 EJECT
11 CHASE
12 COMMAND ERROR RESET
13 MMC RESET
< Assigning RPN/NRPN to a Fader/Rotary Controller
Note: For a detailed description of RPN/NRPN data see the “MIDI Mesages Explained” section.
1. Select the desired control as described earlier.
2. Press the EDIT button, then the CTRL ASGN key.
3. While the display is flashing, enter controller “132” for RPN Coarse, “133” for RPN Fine, 134 for NRPN Coarse or 135 for NRPN Fine using
the numerical data entry keys or OCTAVE buttons.
4. Press Enter to confirm the number entered.
5. Press the DATA 3 key. This assigns the number for the RPN/NRPN MSB.
6. Press the DATA 2 key. This assigns the number for the RPN/NRPN LSB.
7. Finally, set the channel the message should be sent on.