


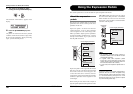
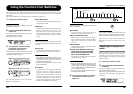

Using the Expression Pedals
ZOOM G9.2tt
32
Assigning control targets
to expression pedal 1
This section describes how to assign a control
target to expression pedal 1.
1. In play mode, select the patch.
HINT
The parameters to be controlled by expression
pedals 1/2 and the setting range can be set
separately for each patch.
2. Press the [PEDAL 1 SETTING] key.
The display changes as follows.
HINT
The expression pedal 1/2 setting is included in the
TOTAL/FUNCTION module for the respective
patch. The above display can also be called up by
pressing the [TOTAL/FUNCTION] effect module
key and turning the [TYPE] knob.
3. Turn the [TYPE] knob to select one of
the four control targets (P1-1 to P1-4).
The operation steps for setting the control targets
P1-1 to P1-4 are the same.
4. Turn parameter knob 1 to select the
parameter that is to be controlled.
As you turn parameter knob 1, the effect
parameter and effect module changes.
HINT
• For information on which parameters can be
selected as control targets, see "Effect Types
and Parameters" on pages 60 - 75.
• When "Volume" is selected as control target,
expression pedal 1 functions as a volume pedal.
• When "NOT Assign" is displayed, no parameter
is assigned to the current control target. By
setting all four control targets to "NOT Assign",
expression pedal 1 can be defeated.
NOTE
If you select "NOT Assign", steps 5 and 6 cannot
be carried out.
5. To set the adjustment range for the
parameter to be controlled, use
parameter knob 2 (minimum value)
and parameter knob 3 (maximum
value).
The settings selected with parameter knobs 2 and
3 determine the value when the pedal is fully
raised (minimum value) and fully depressed
(maximum value).
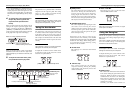
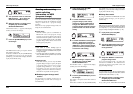
The display changes as follows.
Control target indication
(P1-1 - P1-4)
Control target
parameter name
Module name Effect type name
WAH:AutoWah
WAH:AutoWah
¡P1-1=Resonance
P1-1=Resonance
Minimum value
Maximum value
■ When parameter knob 2 is operated
■ When parameter knob 3 is operated
™min= 50
min= 50
PDL1 :Target1
PDL1 :Target1
é
£MAX=100
MAX=100
PDL1 :Target1
PDL1 :Target1
é
Using the Expression Pedals
ZOOM G9.2tt
33
HINT
• The available range setting depends on the
parameter selected in step 4.
• It is also possible to set "min" to a higher value
than "MAX". In that case, the parameter value
will be minimum when the pedal is fully
depressed and maximum when the pedal is fully
raised.
6.
To use expression pedal 1 for
switching the module on and off, turn
parameter knob 4 and select "Enable".
Expression pedal 1 has a switch that is triggered
when the pedal is pushed a bit further, after the
fully down position is reached. The module to
which the selected parameter belongs will be
switched on or off.
When you turn parameter knob 4, the display
changes as follows.
HINT
If you select "Disable" at the above display,
module on/off switching is not available.
7. Repeat steps 3 – 6 to set the other
control targets in the same way.
NOTE
It is also possible to specify the same parameter
for more than one control target, but in some
cases, extreme parameter value changes may lead
to noise. This is not a defect.
8. When all settings for expression pedal
1 have been made, press the [EXIT]
key.
The unit returns to play mode.
9. If required, store the patch.
NOTE
Any changes in pedal settings will be lost when
you select a new patch. Be sure to store the patch
if you want to keep the changes (→ p. 28).
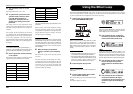
Assigning control targets
to expression pedal 2
This section describes how to assign a control
target to expression pedal 2. For the vertical
direction and the horizontal direction, four control
targets each can be assigned. Module on/off
switching is available for the vertical direction
only.
1. In play mode, select the patch.
2. Press the [PEDAL 2 SETTING] key.
The display changes as follows.
HINT
The expression pedal 1/2 setting is included in the
TOTAL/FUNCTION module for the respective
patch. The above display can also be called up by
pressing the [TOTAL/FUNCTION] effect module
key and turning the [TYPE] knob.
3. To assign a control target for the
vertical direction, turn the [TYPE]
knob to select one of the four vertical
direction control targets (P2V1 to
P2V4).
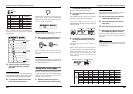
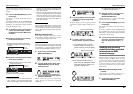
¢Switch:Enable
Switch:Enable
PDL1 :Target1
PDL1 :Target1
é
Control target indication
(P2V1 – P2V4, P2H1 – P2H4)
Control target parameter name
Module name Effect type name
WAH:AutoWah
WAH:AutoWah
¡P2V1=Resonance
P2V1=Resonance