


ZOOM G9.2tt
12
Quick Guide 2
(Edit Mode/Store Mode Operation)
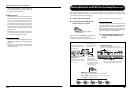
This section explains how to edit a selected patch and how to store the changes you have made.
¡Depth =100
Depth =100
é
MOD:Chorus
MOD:Chorus
™STORE?åU0-1 é
NEWDrive £:PATCH
U0
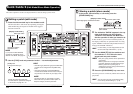
Editing a patch (edit mode)
HINT
• The effect type (distortion type) of the PRE-AMP
module can be changed with the [AMP TYPE]
knob.
• The major parameters of the PRE-AMP/EQ
module can be edited with the knobs of the pre-
amp section, in the same way as in play mode.
NOTE
The changes that you have made to a patch
will be lost when you select another patch. To
keep the changes, store the patch first.
NOTE
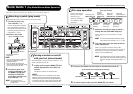
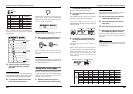
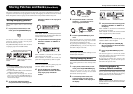
[Display in edit mode ]
Effect type name
Parameter value
Parameter number/
Parameter name
Module name
If you press the PRE-AMP/EQ
module key, the display will be
different. For details, see page 25.
The unit switches to edit mode. By repeatedly pressing the
effect module key, the respective module can be toggled
between on and off.
1. Press the effect module key for the module to edit.
2. Use the [TYPE] knob and parameter knobs 1 – 4 to make adjustments.
[TYPE] knob
Changes the effect type.
Parameter knobs 1 – 4
Change the respective parameter.
For information on parameters assigned
to the knobs, see page 60 – 75.
Quick Guide 2 (Edit Mode/Store Mode Operation)
ZOOM G9.2tt
13
¡Depth =100 é
MOD:Chorus
™STORE?
STORE?
åU0-1
U0-1
é
NEWDrive
NEWDrive
£:PATCH
:PATCH
U0
U0
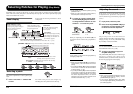
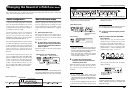
Storing a patch (store mode)
HINT
NOTE
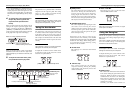
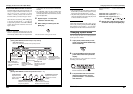
In this condition, you can store individual patches. If
the display is different, use parameter knob 2 to bring
up the "STORE?" indication and parameter knob 3 to
bring up the "PATCH" indication.
The store process is carried out, and the unit returns to
play mode.
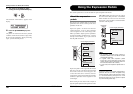
1. In play mode, manual mode, or edit mode, press the
[STORE/SWAP] key.
[Display in store mode]
Store target group name/bank number
Store source patch name
Store target group name, bank number,
patch number
2. The indication "PATCH" appears in the top
right of the display and the indication
"STORE?" in the bottom left. Make sure
that the operation is what you intend to do.
3. Use the BANK [W]/[Q] foot switches and
foot switches 1 – 5 to select the store
target bank and patch number.
4. Press the [STORE/SWAP] key once more.
In store mode, you can swap patches as well
as store and swap entire banks (→ p. 28).
HINT
You can return the user group patches easily
to the factory default settings (→ p. 29).
• Only user group patches can be specified as
store target.
• When a patch from a user group is selected,
this patch becomes the default store target.
• When a patch from a preset group is
selected, the first user group patch becomes
the default store target.