


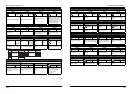


Cubase LE 4 installation Connections and preparation Use Cubase LE 4 to record
Cubase LE 4 installation
Windows Vista / XP
Connections and preparation Use Cubase LE 4 to record
Cubase LE 4 installation
MacOS X
Connections and preparation Use Cubase LE 4 to record
Continued overleaf
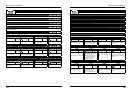
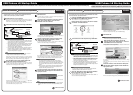
To connect this unit to a computer running Windows Vista (or
Windows XP) and to enable audio input/output, proceed as
follows. The installation description uses Windows Vista as an
example.
Download the latest ASIO driver from the web site of
ZOOM Corporation (http://www.zoom.co.jp) and install
the driver.
The ASIO driver software is required to enable use of Cubase LE 4 for
audio input and output with a computer. Refer to the read_me file
included in the download package for instructions on how to install
the driver correctly.
Insert the supplied "Cubase LE 4" DVD-ROM into the
DVD drive of the computer, and perform the
installation steps.
When you insert the DVD-ROM, a screen asking what you want to do
appears. Select "Open folder to view files".
When the contents of the DVD-ROM are shown, open the "Cubase
LE 4 for Windows" folder by double-clicking on it, and then double-
click the executable "Setup" ("Setup.exe") file to start the installation
process.
HINT
If nothing happens when you insert the DVD-ROM, open the Start
menu and select "Computer" ("My Computer" in Windows XP). Then
double-click the "Cubase LE 4" DVD-ROM icon to display the
contents of the DVD-ROM.
NOTE
When the installation of Cubase LE 4 is complete, a screen asking
about installation of activation (software license authentication)
management software appears. Install this software, because it is
required for registering Cubase LE 4.
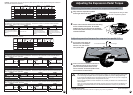
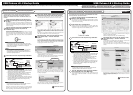
Connect this unit to the computer using a USB cable.
NOTE
• If you monitor the audio signal during recording via the audio output
of the computer, there will be an audible delay. Be sure to use the
[OUTPUT] jack of this unit to monitor the signal.
• When this unit is operated on USB bus power via the USB cable,
insufficient power may result in unstable operation or error
indications appearing on the display. In such a case, power the
device from an AC adapter or batteries.
• Use a high-quality USB cable and keep the connection as short as
possible. If USB bus power is supplied to this unit via a USB cable
that is more than 3 meters in length, the low voltage warning
indication may appear.
HINT
No special steps are necessary for canceling the USB connection.
Simply disconnect the USB cable from the computer.
When you connect this unit for the first time to a computer running
Windows Vista, a message saying "New Hardware Found" will appear.
Before proceeding, wait a while until this message disappears.
Bring up the "Sound" window from the Control Panel
and make the input device setting for the computer.
To bring up the "Sound" window, select "Control Panel" from the
Start menu and click "Hardware and Sound", then click "Sound".
In the "Sound" window, verify that "USB Audio CODEC" is listed
under the Play and Record devices and that the device is checked. (To
switch between Play and Record, click the tabs at the top of the
window.)
If the device is not checked, right-click on the icon for the device and
click "Set as Default Device" so that a check mark appears.
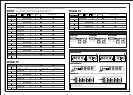
Start Cubase LE 4. Then access the "Devices" menu,
select "Device Setup..." and click "VST Audio
System".
To start Cubase LE 4, double-click the Cubase LE 4 shortcut icon that
was created on the desktop. After startup, select "ZOOM ASIO
Driver" as the ASIO driver in the right section of the Device Setup
window. When you change the ASIO driver selection, a confirmation
message appears. Click the "Switch" button.
The device indication in the left section of the window now shows
"ZOOM ASIO Driver" as the ASIO driver.
Click on this indication to select it, and then click the "Control Panel"
button in the right section of the Device Setup window.
The window that appears lets you set the latency and sampling
frequency for the ASIO driver. The latency should be set to a value
that is as low as possible without causing sound dropouts during
recording and playback.
When the setting is complete, click the OK buttons in the respective
windows to return to the startup condition of Cubase LE 4.
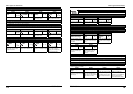
[INPUT] jack
Computer
Guitar or other instrument
A
C adapter
Batteries
or
USB cable
This unit
[OUTPUT] jack
Audio system or other
hi-fi playback equipment
ASIO driver
Click here...
Then click here
USB/Cubase LE 4 Startup Guide USB/Cubase LE 4 Startup Guide
This USB/Cubase LE 4 Startup Guide explains how to install Cubase LE 4 on a computer, make connections and settings for this unit, and perform recording.
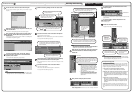
To connect this unit to a computer running MacOS X and enable
audio input/output, proceed as follows.
Insert the supplied "Cubase LE 4" DVD-ROM into the
DVD drive of the Macintosh.
The contents of the DVD-ROM appear automatically. If nothing
happens when you insert the DVD-ROM, double-click the "Cubase LE
4" icon shown on the desktop.
Install Cubase LE 4 on the Macintosh.
When the contents of the DVD-ROM appear, open the "Cubase LE 4
for MacOS X" folder by double-clicking it, and then double-click the
"Cubase LE 4.mpkg" file to start the installation process.
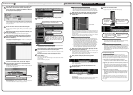
Connect this unit to the computer using a USB cable.
NOTE
• If you monitor the audio signal during recording via the audio output
of the computer, there will be an audible delay. Be sure to use the
[OUTPUT] jack of this unit to monitor the signal.
• When this unit is operated on USB bus power via the USB cable,
insufficient power may result in unstable operation or error
indications appearing on the display. In such a case, power the
device from an AC adapter or batteries.
• Use a high-quality USB cable and keep the connection as short as
possible. If USB bus power is supplied to this unit via a USB cable
that is more than 3 meters in length, the low voltage warning
indication may appear.
HINT
No special steps are necessary for canceling the USB connection.
Simply disconnect the USB cable from the computer.
Open the "Applications" folder and then the "Utilities"
folder, and double-click "Audio MIDI Setup".
The Audio MIDI Setup screen appears. Click "Audio Devices" and
check whether "USB Audio CODEC" is selected as default input/
default output.
If another device is selected, use the pull-down menu to change the
selection to "USB Audio CODEC".
When the setting has been made, close Audio MIDI Setup.
Start Cubase LE 4. Then access the "Devices" menu,
select "Device Setup..." and click "VST Audio
System".
To start Cubase LE 4, double-click on the Cubase LE 4 icon that was
placed in the "Applications" folder during installation.
After startup, be sure to verify that "USB Audio CODEC (2)" is
selected as ASIO driver in the right section of the Device Setup
window.
If another item is selected, use the pull-down menu to change the
selection to "USB Audio CODEC (2)".
When the setting has been made, click the OK button to close the
window.
Macintosh
A
C adapter
or
USB cable
[INPUT] jack
Guitar or other instrument
Batteries
This unit
[OUTPUT] jack
Audio system or other
hi-fi playback equipment
Continued overleaf