


36
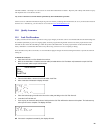
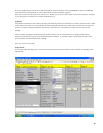
Step 1--Enter information about you and the Cal=Trak
Company: Enter the name of your Company
Reference: Enter your reference number that will be shown on the calibration certificate
Project/file number: Enter your internal project number that will be shown on the calibration certificate
Date of calibration: Will be automatically filled in here. To enter date manually (Used for certificate data only) type in date.
Suggested recal date: Will be automatically filled in with today's date + 1 year
Software release: Current software version 2.03, cannot not be edited
System ERROR: Uncertainty of the Cal=Trak, factory set at 0.4%. Change to 0.2% for use with Cal=Trak SL-800.
Certificate type: Select the type of certificate you are going to generate (Determines title of the Certificate, no other effect)
Measured gas pressure: this information is obtained from the Cal=Trak
Measured Gas temperature: this information is obtained from the Cal=Trak
Calibration gas: Use the pull-down menu to select the gas you will use for the calibration. At this moment this is only suitable for Air and
Nitrogen. Consult factory for other gasses
Performed by: Enter your name here. It will be printed on the certificate
Comport Cal=Trak: Select the RS232 Com port to which the Cal=Trak will be connected (Selectable from Com port 1 to 10)
Shots/set: Enter the number of "shots" that the Cal=Trak will have to take at each flow point. (The more "Shots" the more accurate the result
will be but this will also take more time. Common settings for this are 4 to10 shots)
Max. Cal=Trak wait: This is the maximum time in seconds that the program will wait before it aborts it’s data collection. If the flow is very
low you might have to increase this time. It also determines how long the program will wait when you check the zero flow point.
Recommended setting is 30 or 60 seconds. If you select a value below 30 seconds, it is possible the program will stop it’s data collection
before the Cal=Trak completes its cycle. This would result in an error at one or more flow points.
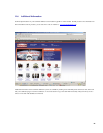
Step 2--In this step you enter information about the DUT
Model: Select the unit you want to certify. The pull down list will show you a number of options that are defined under that Tab
"Instrument information". You can freely edit and add to this data base and than select your specific instrument. Data like accuracy and P+T
effects will be used in the calibration sheet. Only Sierra Models are programmed into the software upon delivery, but others may be added.
Power supply: Select the power supply for the unit (Only used for Certificate sheet data)
Input signal: Here you select the source of the setpoint signal to your DUT. For Flow meter enter NA. For RS232 for a Sierra 100 Series
MFC enter digital. For all others, choose from the pull-down menu the proper setpoint signal for your DUT.
Output signal: Here you select what kind of output your DUT is using. (for RS232 for a Sierra 100 Series, enter digital)
Comport DUT: Select the RS232 Com port on which the Sierra 100 Series will be connected (Selectable from Com port 1 to 10). This will
be used if your DUT is a Sierra 100 Series or if the Sierra 100 Series MFC will be automatically controlling flow into your DUT. If you
will control flow to your DUT manually, select “NONE.”
DUT settle time (s): When using a Sierra 100 Series MFC in automatic mode or when calibrating a Sierra 100 Series MFC, select the
number of seconds that you want your controller to stabilize after the Cal=Soft program gives it a setpoint. (60 seconds recommended).
DMMin serial number: If a DMM is used to measure the DUT setpoint analog signal you can enter the serial # of that DMM here.
DMMout serial number: If a DMM is used to measure the DUT output analog signal you can enter the serial # of that DMM here.
DUT serial number: Serial number of the DUT (If a Sierra 100 Series is connected through RS232, it obtains this automatically)
Maximum Flow: Enter the max range value of the DUT (Add no units, numbers only!) (If a Sierra 100 Series is connected through RS232,
the software obtains this value automatically)
Units: Enter the units of your DUT as you wish them to appear on the Calibration Certificate. The new firmware of Cal=Trak always reads
in “sccm” units, but the program will convert to your chosen units when it completes the certificate. If a Sierra 100 Series is to be used as
part of your calibration system, set the units of the 100 Series to “sccm” to match the Cal=Trak
Gas: enter the gas the DUT will be used with during normal operation. Note that many instruments are calibrated on nitrogen or air even if
they are to be used with a wide variety of gases. If a Sierra 100 Series is connected through RS232, it obtains this information
automatically.
K-Factor: Enter the K-factor that relates that calibration gas to the gas for which the DUT will be used. For air or nitrogen, enter 1.00.