


38
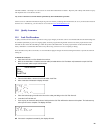
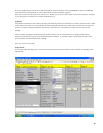
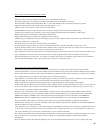
Begin your calibration by defining the flow points that you will measure. These are pre-defined in the program under the heading “%FS” as
0,25,50,75,100. If you want to take data at these 5 points, continue to the next section. If you wish to select alternate flow points, click on
the grey box “%FS” and change to another percent as desired. In the example above, the second flow point has been changed from 25 to 20
using this method. You can only measure up to 5 points per calibration. Should you desire more than 5 points, you will need to run the
program more than one time.
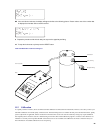
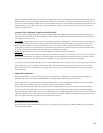
Automatic Flow Calibration Using Sierra 100 Series MFC
If you have selected on the Operating Screen (Step 2) a “Setpoint to MFC” that is DIGITAL, the program will establish communication
with a Sierra 100 Series MFC via the selected COM port. All the squares at the bottom of the red screen will become active when “Please
wait” disappears. You may choose:
Auto Full Run
: By pushing this button you can do a fully automatic calibration run. If the DUT is a Sierra 100 series the settings to this unit
are given by the program and the values from the 100 series and the Cal=Trak are read automatically into the computer software. If the
DUT is not a Sierra 100 Series, but you are controlling the gas flow via a 100 series MFC, the program will automatically generate the
proper gas flows and ask you to input the data from your DUT at the proper intervals. Follow the instructions on the screen until all white
boxes under “Output (DUT)”are filled, then click EXIT when your calibration is complete.
Manual run
: By pushing this button you do a run of the Cal=Trak. No data is transferred to the Program.
Set DUT flow
: If you have a Sierra 100 series connected you can set the gas flow here to any value. Simply enter a setpoint from 0-100% of
FS when asked and click OK. The software will send this setpoint to the Sierra 100 Series and it will generate the flow requested. This is
convenient to confirm that the Sierra 100 Series, DUT or Cal=Trak is working properly before starting an Auto Full Run.
At any time, if you suspect that the data collected at one of the 5 defined flow points is incorrect, you can run just that point again. Click on
the box S0,S1,S2,S3, or S4. The program will set the flow to the value indicated to the left and ask you to enter the value for the DUT.
When you have done this, it will replace the previous data with your new value, run the Cal=Trak automatically and enter the new value
from the Cal=Trak.
Manual Flow Calibration
If the “Setpoint to MFC” you entered in the Operating Screen (Step 2 above) is not DIGITAL, you will be performing a manual flow
calibration. The squares named Auto Full Run, Manual Run and Set DUT Flow will be dark and will not function.
Select the flow points that you will measure or choose the default values for “%FS”. Generate gas flow equal to the flow points selected
using a manual valve or an MFC. Wait up to 2 minutes at each flow point for the flow to stabilize.
Now you will collect data at each flow point by selecting S0 to S4. By pushing these boxes you take the data for these individual flow
points one at a time. The program will ask you to record the flow from the DUT, then it will run the Cal=Trak and record the calibrator’s
measured flow beside your DUT flow. After you have collected data at one point, adjust the gas flow to the next value, wait for the flow to
stabilize and repeat the process. When all the boxes are filled, calibration is complete. NOTE: the Cal=Trak always records data in sccm
units. The program will modify these units to match your DUT in the next step.
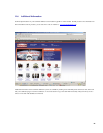
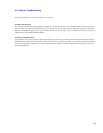
Step 4--Print and or Save the certificate
The Certificate is saved to C:/certification/
If you want to save the file to a different location you can go to the bottom on the certificate (see worksheet "Calibration sheet") and press
the "Save Certificate" button.