


Guided Tour
14 X2 Reference Manual
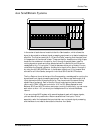
input appears at the monitor controls. This is the position normally used for
mixdown (with the main channel assigned to L-R) or for bouncing tracks (with the
main channel assigned to the appropriate Group or Groups). To avoid low-end
rumble and noise, turn on the HPF (high-pass filter), which removes frequencies
below 75 Hz.
Next we have the EQ section, which is broken into two groups: the Hi & Lo EQ, and
the Hi Mid & Lo Mid EQ. The Hi & Lo EQ are shelf types, nested at 12 kHz and 80
Hz, respectively, with an adjustable gain of ±15 dB. These act much like the bass and
treble knobs found on a typical amplifier. They can be assigned to the monitor path
by pressing the TO MON switch located between the two knobs. The Hi Mid & Lo
Mid EQ are true parametric types, with a sweepable bandwidth of 650 Hz to 15 kHz
and 45 Hz to 950 Hz, respectively, with an adjustable gain of ±15 dB. The Q control
adjusts how wide an area around the selected frequency should be cut or boosted,
allowing you to be extremely specific about how you tailor your sound.
We’ll get back to the Aux Sends in a moment. Now let’s jump down to the Monitor
section. Normally, this is where you can mix your tape returns. Here you have a
PAN knob, SOLO and MUTE buttons, and a fader for controlling the monitor level.
The PEAK LED will light momentarily whenever the monitor’s signal gets too hot.
The L-R button lets you assign the monitor signal to the Master outputs. If you’re
not using the monitor, leave this button turned off.
Finally, at the bottom of each channel we find the channel’s fader, PAN knob, SOLO
and MUTE buttons, PEAK LED, and a set of buttons that let you determine the
routing of the channel’s signal, and what signal the TAPE OUT jacks of the channel
will receive. DIR selects the source of the TAPE OUT jacks of the channel strip:
either the direct output of the channel itself (for recording a single source to a track)
or the Group that is normally connected to that TAPE OUT (Group 1 in channels 1,
9, 17; Group 2 in channels 2, 10, 18; etc.). The assignment switches below DIR can
route the channel’s signal to any of the eight Groups and to the L-R Master.
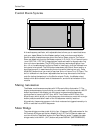
Once signals are routed to the Group section, you can use the Group faders to
determine the total volume of all channels assigned there. Each Group module has
its own set of SOLO and MUTE buttons. In the studio, the Group output usually is
connected to the inputs of a multitrack recorder, such as the Alesis ADAT via the
TAPE OUT jacks. During mixdown, the Groups may be “subgrouped” or assigned
to the L-R Master mix, so that the Group modules can be used to adjust the master
volume of like signals, such as multiple channels of drums or vocals. Using the
ASSIGN L and ASSIGN R buttons, the Group signal can be routed back to the
Master outputs. In live performance applications, the Group Out jacks may be used
to feed other amplifiers, broadcast feeds or recorders where multiple mixers are
required.