


51 X32 COMPACT DIGITAL MIXER User Manual
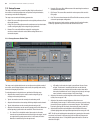
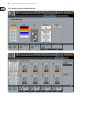
7. 5 Setup Screen
The setup screen oers various controls for global, high-level functions of
the console such as display adjustments, sample rates and synchronization,
usersettings, and network conguration.
The setup screen contains the following separate tabs:
1. Global: This screen oers adjustments for various global preferences of how
the console operates.
2. Cong: This screen oers adjustments for sample rates and synchronization,
as well as conguring high-level settings for signal path buses.
3. Remote: This screen oers dierent controls for setting up the
console as a control surface for various DAW recording software on a
connectedcomputer.
4. Network: This screen oers dierent controls for attaching the console to a
standard Ethernet network.
5. DCA Groups: This screen oers controls for various aspects of the console’s
DCA groups.
6. Card: This screen selects between the USB and FireWire connectors, and also
selects the input/output conguration.
None of the setup screen’s tabs contain a secondary level of encoder functions,
sothe Layer up/down keys do not need to be used for these screens.
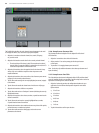
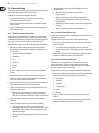
7.5.1 Setup Screen: Global Tab:
The setup screen’s global tab allows the user to adjust various global controls of
the console, such as display brightness and contrast, the panning mode used by
channels, text languages, and more.
To make adjustments in the global screen, perform the following steps:
1. Adjust the rst encoder to select various console settings for pop-up
messages and assorted preferences.
2. Tap the 1st encoder to turn the currently selected setting on/o.
3. Adjust the 2nd encoder to select settings for linking multiple consolechannels.
4. Tap the 2nd encoder to turn the currently selected setting on/o.
5. Adjust the 3rd encoder to set the console’s panning mode, which aects how
channel panning is performed in the stereo eld. The two choices are:
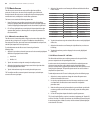
• LR + Mono: This is the default mode of the console. In this mode,
channels can be panned between the left and right mix outputs, as well
as assigned to the separate mono mix bus. In this mode, the Center/
Mono bus is not aected by from the pan control.
• LCR enable: In this mode, the signal is panned from Left over Center
to Right. This behavior is emulated by the faders on the Main tab,
abehavior that is more intuitive than on other consoles. Note that in
this mode, the denition of “mono” changes since the setup is no longer
mono, but rather a setup consisting of Left-Center-Right.
6. Adjust the 4th encoder to set the brightness of the various LED lights of the
console, from a range of 1-100.
7. Adjust the 5th encoder to set the brightness of the color screen
(maindisplay), from a range of 1-100. In order to prevent any errors by losing
power during a store operation, we recommend using the “Safe Shutdown”
function by pressing the 5th encoder, then turning the power switch o.
8. Adjust the 6th encoder to set the brightness of the individual LCD screens
(channel display) above each input and output channel, from a range of1-100.
NOTE: The X32 can be locked against unintended use by pressing the 6th encoder
to activate ’Lock Console’. In this state, the UI will not allow any changes to be
made and the display shows “X”. Keep HOME depressed for about 5 seconds to
unlock the X32 again.