


65 X32 COMPACT DIGITAL MIXER User Manual
7.13 Scenes Screen
The scenes screen allows setup for saving and recalling dierent memory scenes
of the console. The comprehensive recallability of the console (including gain
settings for the digitally controlled mic preamps) is one of the most powerful
aspects of the console.
The scenes screen contains the following separate tabs:
Home: This screen contains a general overview of the scenes contained in the
console, along with their custom names and what parameters are included in
each scene.
MIDI: This screen allows the console to associate dierent scenes with incoming
and outgoing MIDI messages, allowing the console’s scene changes to control or
be controlled by external MIDI equipment.
Parameter Safe: This screen congures which console parameters are and are
not saved/switched with the console scenes.
Channel Safe: This screen congures which console channels are and are not
changed when a console scene change occurs.
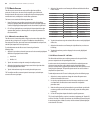
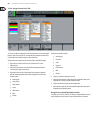
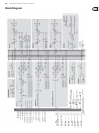
7.13.1 Scenes Screen: Home Tab
The scenes screen’s home tab shows a general overview of the scenes that
have been congured in the console, along with their custom names and what
parameters are included in each scene.
For a setting where scenes are used heavily and are very critical (such as a theater
performance), this would be a good screen to leave on at all times so that the
console operator can be completely sure, at all times, what scene the console
currently resides on and what scene will come up next when the “Go” button
ispressed.
To adjust the various settings on the home tab, perform the following steps:
1. Rotate the 1st encoder to scroll among the available scenes in the scenes list,
which is displayed on the left side of the color screen.
2. Tap the 1st encoder to “go” to the currently selected scene in the list,
switching the console to the state it was in when that scene was stored
3. Rotate the 2nd encoder to select a scene in the list to be “skipped”
whencycling through scenes using the Prev and Next buttons.
4. Tap the 2nd encoder to complete the “skip” command on the currently
selected scene. That scene will now be skipped when scrolling through
thelist.
5. Rotate the 3rd encoder to scroll back through recent changes.
6. Tap the 3rd encoder to undo the recent change.
7. Rotate the 4th encoder to select a slot to save a new scene.
8. Tap the 4th encoder to complete the save operation. The console’s current
state will be overwritten on the scene number that was selected with
theencoder.
9. Rotate the 6th encoder to select which aspects of the console’s routing
are made “safe” from a scene change, and will be unaected by any scene
changes that occur. Routing choices that can be safed include:
• Routing
• Output Patch
• Mic Preamp Gain (HA, short for head-amplier)
• Conguration
• Channel Processing
• Mix Buses
• Eects
• Talkback
10. Tap the 6th encoder to select any of the above choices as the encoder
rotation is used to select them. Multiple categories can be selected at the
same time.
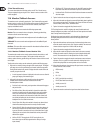
7.13. 2 Scenes Screen: MIDI Tab
This MIDI tab of the scenes screen allows the console to associate dierent scenes
with outgoing MIDI messages, allowing the console’s scene changes to control by
external MIDI equipment.
For instance, the user could congure the console to issue a MIDI program
change message as each new scene is recalled, with the outgoing MIDI message
triggering a new scene of a MIDI-equipped lighting controller.
Note - Scenes can be recalled via MIDI using simple Program Change 1-100
commands, provided that MIDI Scene Recall is generally enabled on the
Setup/Remote page.
To adjust the various settings on the MIDI tab, perform the following steps:
1. Rotate the 1st encoder to select a scene to edit.
2. Tap the 2nd encoder to “safe” the console from any incoming MIDI messages,
preventing the console from switching scenes in response to MIDI data.
3. Rotate the 3rd encoder to select what type of MIDI event is transmitted by
the console when a scene change is issued. The choices include:
• O (No MIDI event)
• MIDI program change
• MIDI control change
• Note
4. Encoders 4, 5 and 6 adjust the channel, number, and velocity (if applicable).
The color screen displays the MIDI data associated with the currently
selectedscene.