


29
Note:
• You do not need to store memory banks or
registers to the same memory banks or registers
on the USB drive.
• If you save an empty memory bank or register, the
destination bank or register on the USB drive is
erased.
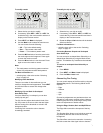
Loading Memory Banks and Registers
Once the memory registers are loaded, you can recall
them for use.
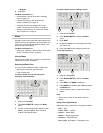
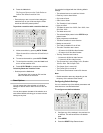
To load memory registers from a USB drive:
1. Insert a USB drive into the USB port.
2. Press MENU.
3. Press the LOAD Wipe Pattern button.
4. Press the Mems knob to display the Load
Memory menu.
5. Press NEXT to cycle through the sets.
6. Press the knob for the set you want to load the
memory registers from.
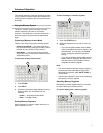
7. Use the left knob to select which memory
registers you wish to load. You can choose from
the following:
• All — All memory banks and registers are
replaced with the stored memory banks and
registers from the selected set on the USB
drive.
• Bank — You can specify which memory bank
to load from the USB drive and which memory
bank on the switcher to replace with the
loaded values.
• Indiv — You can specify which memory
register to load from the USB drive and which
memory register on the switcher to replace
with the loaded values.
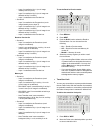
8. If you selected Indiv or Bank, select the memory
bank or register to load as follows:
• If you selected Indiv, use the Local knob to
select the memory register you wish to replace
with the loaded data. The selected register is
indicated as X.Y where X is the memory bank
and Y is the memory register. Use the USB
knob to select the memory register on the
USB drive you wish to load.
• If you selected Bank, use the Local knob to
select the memory bank you wish to replace
with the loaded data. Use the USB knob to
select the bank on the USB drive you wish to
load.
9. Press the left knob to commit the load.
10. Press the Confrm knob to perform the load.
Press the Cancel knob to cancel the load.
Note:
• You do not need to load memory banks or registers
on the USB drive to the same memory banks or
registers on the switcher.
• If you load an empty memory bank or register from
a USB drive, the destination bank or register on the
switcher is erased.
For More Information on...
• using the memory system, refer to the section
“Using the Memory System” on page 23.
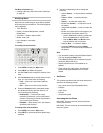
Software Upgrades
Software upgrades stored on a USB drive can be
uploaded to the switcher.
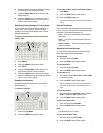
To upgrade the switcher software:
1. Copy a software upgrade file onto a USB drive.
Do not store multiple upgrade files on the same
USB drive.
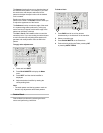
2. Insert the USB drive with the software upgrade
file into the USB port.
3. Press MENU.
4. Press the RESET Wipe Pattern button.
5. Press NEXT until Run Software Upgrade From
USB is displayed.
6. Press the left knob.
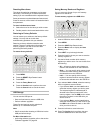
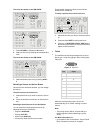
7. Press the Confrm knob to initiate an upgrade.
Press the Cancel knob if you do not wish to
perform an upgrade.
The menu displays a message indicating the software
upgrade is in progress. The Upgrade LED on the rear
of the switcher is lit, indicating an upgrade is in
progress.
4
3 5
2
6
4 5
3