


2
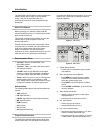
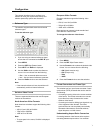
6. Aux Bus Buttons
• Assigns the Key/Aux bus to selected Aux bus
when button is pressed (KM-H3000 only).
• Aux bus assignment is done through the menu
interface on KM-H2500 switchers.
7. On-air LEDs
• The LEDs light to indicate which keys are
on-air.
8. Key/Aux, Program, and Preset Bus
• Press source buttons on the Key/Aux,
Program, or Preset bus to select video
sources on each bus.
• Selected source buttons glow with a
user-definable color. Sources that are on-air
glow red.
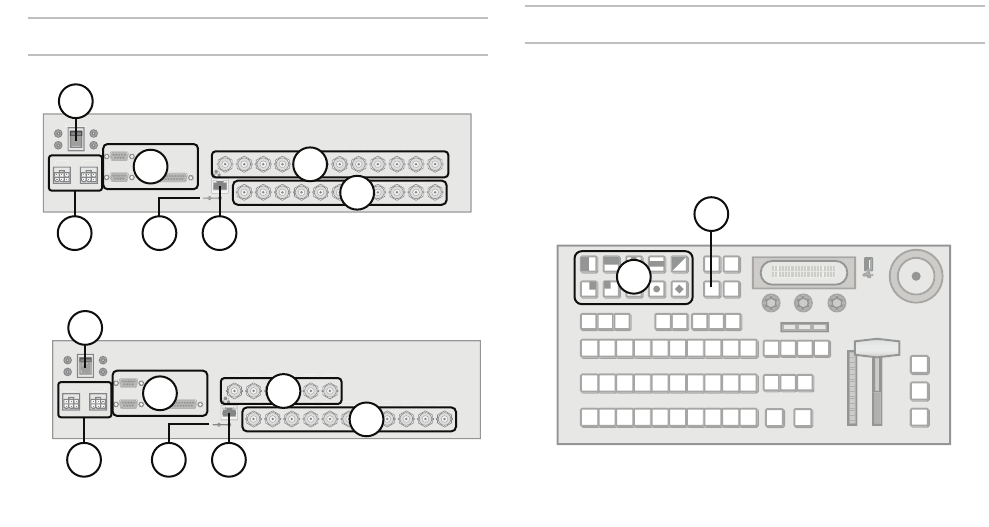
9. Next Transition Area
• Selects the elements (background, keys) to
include in the next transition.
• Selects the transition type.
• Performs an automatic transition or a cut.
10. Fader
• Use the Fader to manually control transitions.
11. Key Transition Shortcut Buttons
• Performs a transition of the selected key.
12. Positioner
• Use the positioner to control wipes, borders,
and washes (KM-H3000 only).
13. USB Port
• Plug a USB drive into the USB port to load
and store memories and to perform software
upgrades.
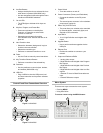
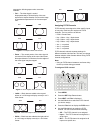
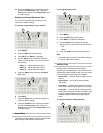
Control Panel Rear Connections Overview
Figure 3 KM-H3000
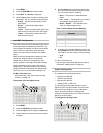
Figure 4 KM-H2500
1. Power Switch
• Turns the switcher on and off.
2. Power Connectors (Primary and Redundant)
• Connects the switcher to the DC power
supply.
• The second power connector is for redundant
power supply (optional).
3. Editor, Tally, and GPI Ports
• The ports allow your switcher to be controlled
by external editors, control tally lights, and
respond to GPI commands.
4. Input BNCs
• 12 or 6 High Definition serial digital video
inputs.
5. Upgrade Button
• Use to perform software upgrades via the
USB port.
6. Ethernet Port
• Enables the switcher to connect to your
network.
7. Output and Reference BNCs
• 1 analog video output.
• 2 High Definition serial digital video Program
Bus outputs.
• 1 High Definition serial digital video Preview
Bus output.
• 3 High Definition serial digital video Aux Bus
outputs.
• 1 External Tri-level or Black Burst reference
input.
• 3 Internal Reference outputs.
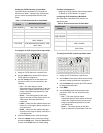
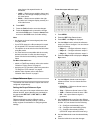
Menu System
There are two ways to access the menu system:
• Pressing MENU
• Using Auto-follow
To access a menu using the MENU button:
IN
1
I
N
2
I
N
3
IN
4
IN
5
I
N
6
I
N 7 IN
8
I
N
9
I
N
10
I
N
11
IN
12
A
U
X
1
AU
X
2
AU
X
3
PV
P
G
M
1
PG
M
2
A
NL
G
OU
T
REF
OU
T
1
REF
OU
T
2
REF
OU
T
3
REF IN
G
P
I
TALLY
P
S
1
P
S
2
PO
WE
R
U
PGRAD
E
E
DIT
OR
O
N
O
F
F
1
3
2
4
5 6
7
IN
1
I
N
2
I
N
3
IN
4
IN
5
I
N
6
A
U
X
1
AU
X
2
AU
X
3
PV
P
G
M
1
PG
M
2
A
NL
G
OU
T
REF
OU
T
1
REF
OU
T
2
REF
OU
T
3
REF IN
G
P
I
TALLY
E
DIT
OR
P
S
1
P
S
2
P
O
WE
R
O
N
O
F
F
U
PGRAD
E
1
3
2
4
5 6
7
1
2