


2. Connect your USB mobile charging cradle to your computer and dock your
Pulse smartpen to the cradle.
3. If this is the first time you have used your Pulse smartpen with Livescribe
Desktop on this computer, Livescribe Desktop will ask you to name your Pulse
smartpen.
4. If you have not registered your Pulse smartpen with Livescribe, Livescribe
Desktop will prompt you to do so. Registering extends your warranty from 90
days to one year from the date of purchase. Once you register, you will be
able to upload notes, download applications, and create a personal account on
Livescribe Online. See Registering Your Pulse Smartpen
.
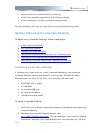
5. Click the Pulse Smartpen Selector
in
the Main tool bar to choose which Pulse smartpen to view in Livescribe
Desktop. If you have one Pulse smartpen installed, Livescribe Desktop will
select it by default.
When you dock your Pulse smartpen, Livescribe Desktop will automatically
check for software updates for the Pulse smartpen you have selected. You
also must have a Livescribe user account to receive updates. If updates are
available, Livescribe Desktop will prompt you to install these now or later.
Important: Docking your Pulse smartpen will transfer your notes and audio
to Livescribe Desktop automatically. Once your Pulse smartpen is docked, do
not remove it from the cradle until the transfer is complete. Livescribe
Desktop will display a message confirming the transfer was successful.
6. Each installation of Livescribe Desktop can support more than one Pulse
smartpen. For example, if you have two or more Pulse smartpens, you can
assign them all to one computer running Livescribe Desktop. If you have
another Pulse smartpen to install, follow the steps above for each Pulse
smartpen.
Page 4 Livescribe Desktop User Manual