


Connection panel
V-Accordion
r
13
Connection panel
S
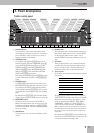
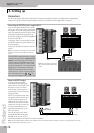
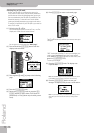
TO FBC-7 socket
Use the supplied cable to connect this socket to the
supplied FBC-7 power supply/footswitch unit/bat-
tery charger. This may be necessary in the following
cases:
• To power the FR-7/FR-5 without using the supplied
battery. In most instances, this may be unnecessary,
because the supplied battery (FR-7) lasts up to 8
hours.
Note: See also “Connecting the FBC-7” on p. 31 for details
about maximizing the life span of the battery.
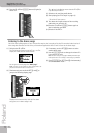
If you connect the 19-pin cable, be sure to never
place the FR-7/FR-5 on the side when not using it.
• Always stand the V-Accordion on its rubber feet (and
in the corresponding direction) to avoid damaging
the 19-pin plug.
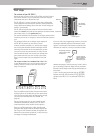
• Always handle and move the FR-7/FR-5 with care
and pay special attention to the cable slack to avoid
damaging or bending the 19-pin cable.
• If you place the FR-7/FR-5 on your lap, ensure that
the 19-pin cable runs between you legs (not side-
ways) to avoid damaging or bending the 19-pin
cable.
• To be able to control certain functions by foot (see
p. 31).
• To use the FR-7/FR-5 as a MIDI controller (only the
FBC-7 has MIDI sockets).
T
OUTPUT L/MONO & R/MONO sockets
These sockets can be connected to an amplifier, a
mixing console or a wireless system.
If you use both connectors, the FR-7/FR-5’s output is
stereo. If you only use one jack (connected to the “L”
or “R” socket), the FR-7/FR-5’s output is mono.
Note: If you don’t want to use a wireless system, consider
connecting the FR-7/FR-5 to the FBC-7 when you need to
connect it to an external amplifier.
Note: On the FR-7, connecting jacks to these sockets does not
mute the internal speakers.
U
PHONES socket
This is where you can connect stereo headphones
(Roland RH-25, RH-50 or RH-200). On the FR-7, con-
necting a pair of headphones mutes the internal
speakers.
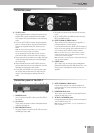
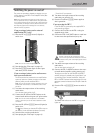
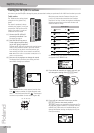
Connection panel of the FBC-7
A
POWER ON switch
Press it to switch the FBC-7 (but not the FR-7/FR-5)
on and off.
B
AC connector
This is where you need to connect the supplied power
cable. See also page 15.
C
MIDI THRU/OUT/IN sockets
Use these sockets to connect the FR-7/FR-5 to exter-
nal MIDI gear (see p. 66).
D
OUTPUT R/MONO & L/MONO sockets
Connect these sockets to an external amplifier or
mixing console. For stereo operation, be sure to con-
nect both jacks.
E
EXPRESSION PEDAL socket
This is where you can connect an optional EV-series
expression pedal (see p. 31).
F
TO FR7/5 V-ACCORDION socket
Use the suplied 19-pin cable to connect this socket to
your FR-7/FR-5 (see p. 31).
Note: See also “Using the FBC-7” on p. 31 for additonal func-
tions of the FBC-7.
R
S
T
AB CDEF