


Panel Descriptions
7
ENGLISH
ENGLISH
ENGLISH ENGLISH ENGLISH ENGLISH
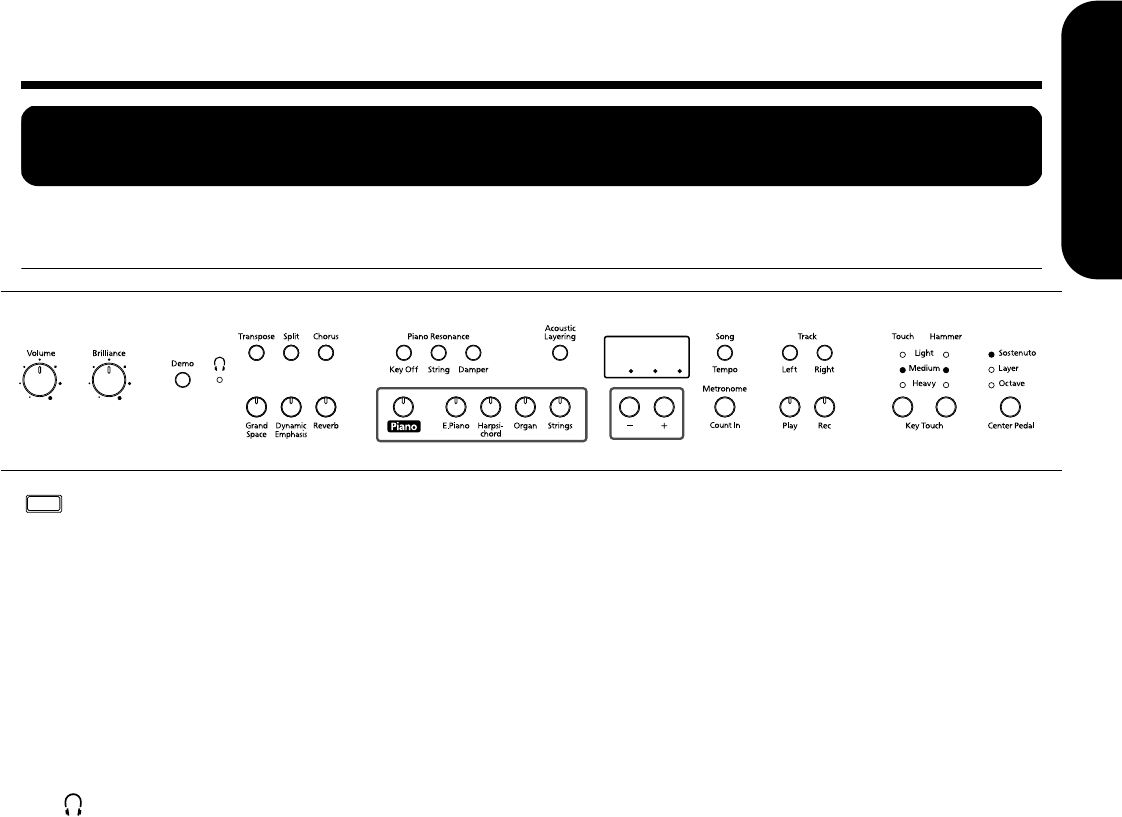
Panel Descriptions
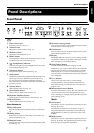
Front Panel
1.
[Power On] switch
Turns the power on/off (p. 11).
2.
[Volume] knob
Adjusts the overall volume level (p. 11).
3.
[Brilliance] knob
Adjusts the tone brightness (p. 11).
4.
[Demo] button
You can listen to a demo of the instrument’s tones as well
as a demo of the various functions (p. 14).
5.
[ (Headphones)] indicator
This indicator lights up when headphones are connected
to the headphone jack (p. 10).
6.
[Transpose] button
Transposes the pitch of the keyboard (p. 19).
7.
[Split] button
Divides the keyboard into right-hand and left-hand areas,
allowing you to play a different sound in each area (p.
21). You can also set a number of different functions
when this button and the [Chorus] button are held down
(p. 29–33, p. 35–36).
8.
[Chorus] button
Adds richness to the sound (p. 18).
9.
[Grand Space] button
Adds a sense of depth to the sound (p. 17).
10.
[Dynamic Emphasis] button
Creates brilliance and liveliness in the sound (p. 18).
11.
[Reverb] button
Adds reverberation to the sound (p. 18).
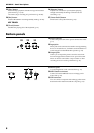
Piano Resonance
12.
[Key Off] button
Plays the sound produced when the keys are released (p.
15).
13.
[String] button
Produces the resonance of the strings created when you
play the keyboard (p. 15).
14.
[Damper] button
Changes the resonance produced when the damper pedal
is pressed (p. 16).
15.
[Acoustic Layering] button
You can layer and play recommended tones that comple-
ment the piano’s own sound (p. 19).
16.
Tone buttons
They are used to choose the kinds of tones (tone groups)
played by the keyboard (p. 15).
17.
Display
The display indicates values for various settings, includ-
ing the tone variation, song number, and tempo. Usually
these will appear as in the figure above.
18.
[Song/Tempo] Button
Used to select from the built-in songs (p. 13, 24).
Furthermore, you can press this button to alternately dis-
play the tempo and the currently selected song number
(indicated by an “S.” before it). The indicator is green
when the tempo is indicated and red when the song num-
ber is displayed.
19.
[–] [+] buttons
Allow you to select the value of various settings.
Pressing both the [–] and [+] buttons simultaneously
returns the setting of a particular item or function to its
original value.
20.
[Metronome/Count In] Button
Turns the metronome on/off (p. 22). Also featured is the
count-in sound, which can be played before the song
starts, allowing you to begin playing with the song with
perfect timing (p. 24).
TRACK
21.
[Left] button
Plays back or records a performance separately for each
hand (p. 25, 27~28).
The left-hand performances of the built-in songs are
assigned to this button. This button and the following
[Right] button are collectively referred to as the “track
buttons.”
22.
[Right] button
Plays back or records a performance separately for each
hand (p. 25, 27–28). The right-hand performances of the
built-in songs are assigned to this button.
4
32
5
92010 11
16 19
6
18
23
21
24 25 26 27
22
12 13 14
15
78 17
1
Power On