11
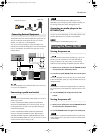
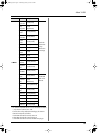
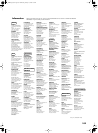
Panel Descriptions
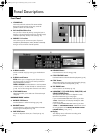
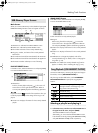
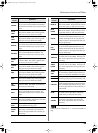
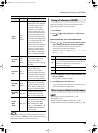
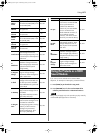
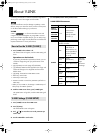
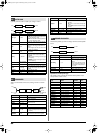
16. VALUE dial
Use this to edit the value of the parameters (settings) in the
screen.
EDIT section
17. Cursor buttons ([ ] [ ] [ ] [ ])
Use these buttons to move the cursor in the screen.
18. EXIT and ENTER buttons
Pressed to issue the “Cancel” (EXIT) or “Execute” (ENTER)
commands in screens that prompt you to make such a
selection.
You’ll also use the ENTER button to access lists of Tones,
Performances, Styles, or Songs.
19.
MENU button
This button takes you to the settings screen for various
parameters (p. 45).
20.
REVERB button
This button lets you make effect settings (p. 40).
21. WRITE button
Press this button to save various types of settings (p. 28,
33, 39).
22.
NUMERIC button
You can input numerical values with the TONE SELECT
buttons (37) when this button is lit (p. 16).
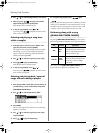
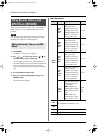
KEYBOARD section
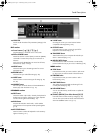
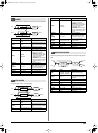
23. SPLIT button
This button selects “Split mode,” whereby the keyboard is
divided into two regions, allowing you to play separate
sounds with the right and left hands (p. 19).
24.
DUAL button
Switches the Prelude to “Dual mode,” which enables
performances with two separate Tones layered together
(p. 19).
25.
KEY TOUCH button
Press this button to make the keyboard’s touch sensitivity
lighter or heavier (p. 21).
26.
V-LINK button
Switching this on lets you control external V-LINK
compatible video equipment (p. 50).
27.
OCTAVE buttons
Use these buttons to raise or lower the pitch of the
keyboard in one-octave steps (p. 21).
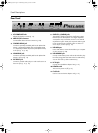
28.
TRANSPOSE button
These button allow you to transpose the Prelude up or
down in semitone steps (p. 21).
29.
MELODY INTELL button
Press this button to add an automatic counter-melody
(second and third voice) to your solos or melodies (p. 22).
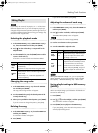
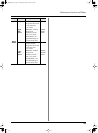
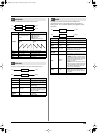
MODE section
30. TONE button
Press this button when you want to select or edit a Tone
(p. 20). Tones you edit are stored in the Performance.
31.
PERFORM button
Press this button when you want to select or edit a
Performance (p. 36).
32.
ONE TOUCH button
This applies the recommended sound settings for the
currently selected Style (p. 26).
33.
USB IMPORT button
You can use USB memory to add Tones or update the
system (p. 49).
34.
[PIANO]~[SPECIAL] (Tone Select buttons)/[0]~[9]
Use these buttons to select Tones by category (p. 20).
You can also input numerical values with these buttons
when the NUMERIC button is on (p. 16).
16
17
19 20
23 24 25 26 30 31
32 33
27 28 29
21 22
18
34
Prelude_e.book Page 11 Wednesday, January 14, 2009 2:18 PM