


Using Your Instrument with Other Devices
CGP-1000 Owner’s Manual
195
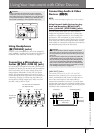
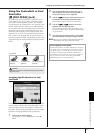
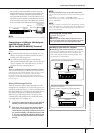
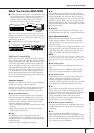
The second connection possibility involves a separate,
external MIDI interface connected to the computer via a
USB port or a serial port (modem or printer terminal).
Using standard MIDI cables, connect the MIDI OUT ter-
minal of the external interface to the [MIDI IN] terminal
of the instrument, and connect the [MIDI OUT] terminal
of the instrument to the MIDI IN terminal of the interface.
n
Make sure to use the appropriate MIDI interface for your computer.
Connecting to a USB-type LAN Adaptor
and USB Storage Device
(9 via the [USB TO DEVICE] Terminal)
There are two ways of using the [USB TO DEVICE] ter-
minal.
■ By connecting the USB-type LAN adaptor, you can
directly access special Internet websites for down-
loading music data (page 176).
■ By connecting the instrument to a USB storage
device with a standard USB cable, you can save data
you’ve created to the connected device, as well as
read data from the connected device.
n
About the [USB TO HOST] and [USB TO DEVICE] terminals
There are two different types of USB terminals on the instrument:
[USB TO HOST] and [USB TO DEVICE]. Take care not to confuse
the two terminals and the corresponding cable connectors.
Be careful to connect the proper plug in the proper direction.
Explanations on the [USB TO HOST] terminal can be found in the
previous section.
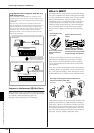
Using USB Storage Devices
This type is used to connect the instrument to a USB
storage device, and allows you to save data you’ve cre-
ated to the connected device, as well as read data from
the connected device. The following description gener-
ally explains about how to connect and use them.
Before using a USB storage device, be sure to read
“Handling the USB Storage Device (USB Flash Mem-
ory/Floppy Disk, etc)” on page 22.
1 Connect the USB storage device to the [USB TO
DEVICE] terminal with a standard USB cable.
2 After that, exit once from the selection display
then return to the display (or press the Tab
switch buttons [
√
] and [
®
] simultaneously from
the selection display). The USB tabs (USB 1, USB
2, etc.) are automatically called up, allowing you
to save files and play back music data from the
devices.
n
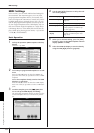
Checking remaining memory on the USB storage device
You can check this in the display called up by the following oper-
ation:
[FUNCTION] → [J] UTILITY → TAB [
√
][
®
] MEDIA
Select the device by using the [A]/[B] buttons in this display and
press [F] (PROPERTY).
n
Even with a computer connected to the [USB TO HOST] terminal
and a USB storage device connected to the [USB TO DEVICE] ter-
minal, you cannot access the USB storage device from the com-
puter via the instrument.
Instrument
MIDI cable
[MIDI IN]
terminal
[MIDI OUT]
terminal
MIDI interface
Computer
USB port or serial
port (modem or
printer terminal)
Formatting USB storage media
For details, see page 68.
CAUTION
Formatting a USB storage media completely erases all
data on the media. Make sure that the USB storage media
you’re formatting does not contain important data!
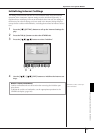
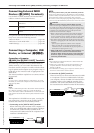
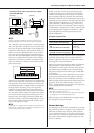
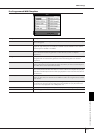
Backing up your data to a computer
■ Backing up the instrument data to a computer
Once you’ve saved data to a USB storage device, you can
copy the data to the hard disk of your computer, then
archive and organize the files as desired. Simply recon-
nect the device as shown below.
Instrument
Instrument
Computer
Computer
USB storage device
USB storage device
USB TO DEVICE terminal
Saves internal data to a USB storage device.
Disconnect the USB storage device from the instrument and
connect it to the computer
Backing up data to a computer and organizing files/folders
Connecting a Computer or USB Device