


Appendix
CGP-1000 Owner’s Manual
210
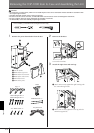
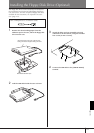
Removing the CGP-1000 from its Case and Assembling the Unit
CAUTION
• Be careful not to confuse parts, and be sure to install all parts in the correct orientation. Please assemble in accordance with
the sequence given below.
• Assembly should be carried out by at least four persons.
• Be sure to use the correct screw size, as indicated below. Use of incorrect screws can damage the instrument.
• Be sure to tighten all screws upon completing the assembly of each unit.
•To disassemble, reverse the assembly sequence given below.
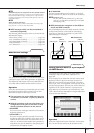
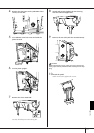
1 Remove the parts shown below from the box. 2 Remove the brackets
Unscrew the brackets.
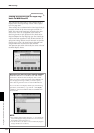
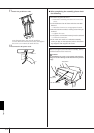
3 Attach the right front and rear legs.
1 Attach and securely tighten the right front leg with
the 70mm hexagon bolts.
2 Attach and securely tighten the rear leg with the
92mm hexagon bolts.
Have a Phillips (+) screwdriver and a hexagonal wrench ready.
1
2
3
5
4
6
1 Cut the bands.
2 Remove the top cover.
3 Remove the front screws.
4 Remove the side screws.
5 Pull off the cover.
6 Remove the parts.
Leg × 3
70mm hexagon bolt × 4
92mm hexagon bolt × 2
Pedal
4.0 × 20mm screw × 4
Pedal brace rod × 2
AC power cord