


89
Song Recording
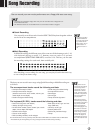
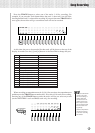
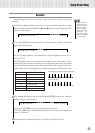
Press the TRACK button to select one of the tracks 1–16 for recording. For
example, if you press the Track button below the track 1, the track 1 bar will light,
showing that the track 1 is selected for recording. If you press the same TRACK button
once again, the track bar will go out and that track will not be recorded.
At this time, the part to be recorded for that track will be shown at the top of the
display. As needed, use the [–] and [+] buttons or the Data Dial to change the part.
Track Default Part Other Parts that Can Be Set
1 R1 R2, L
2 R2 R1,L
3 L R1, R2
4 R1 R2, L
5 R1 R2, L
6 Harmony 1 R1, R2, L
7 Harmony 2 R1, R2, L
8 Harmony 3 R1, R2, L
9 ACMP 1ch (RHYTHM2) R1, R2, L
10 ACMP 2ch (RHYTHM1) —
11 ACMP 3ch (BASS) R1, R2, L
12 ACMP 4ch (CHORD1) R1, R2, L
13 ACMP 5ch (CHORD2) R1, R2, L
14 ACMP 6ch (PAD) R1, R2, L
15 ACMP 7ch (PHRASE1) R1, R2, L
16 ACMP 8ch (PHRASE2) R1, R2, L
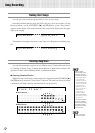
ACMP VOICEVOICEVOICERHYTHM
1
BASS CHORD
1
CHORD
2
PAD PHRASE
1
PHRASE
2
RHYTHM
2
L
R1R2
4
MELODY
3
MELODY
2
MELODY
1
MELODY
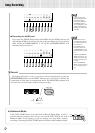
123456789101112131415 16
DUALSPLIT
213213213213213252216471442468434259391337213001
ACCOMPANIMENT TRACK
SONG TRACK
L
R2 R1
161 2 3 4 5 6 7 8 9 10 11 12 13 14 15 16
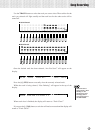
When recording accompaniment tracks (9–16), first turn Auto Accompaniment on
and then press the TRACK buttons numbered 9–16 to select 9–16 tracks for recording.
Pressing any of the TRACK buttons under the tracks will let you select any tracks
(such as RHYTHM 1 track and BASS track only) for recording.
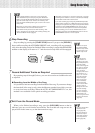
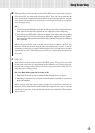
ACMP VOICEVOICEVOICEPHRASE
1
PHRASE
2
L
R1R2
4
MELODY
3
MELODY
2
MELODY
1
MELODY
789101112131415 16
DUALSPLIT
213213213213213252216471442468
SONG TRACK
L
R2 R1
167 8 9 10 11 12 13 14 15 16
ACCOMPANIMENT
ON / OFF
• If the part selected for
a track is the same
one as that being re-
corded, that track
cannot be set for re-
cording at the same
time. Only one track
can be selected, with
the last chosen hav-
ing priority.
• Auto Accompaniment
cannot be turned on
or off once recording
has started.