


11
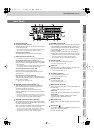
Panel Descriptions
(continued)
Input/output
settings
Introduction Connections Basic operation Switching images Effects BPM sync External devices Video fader Appendices
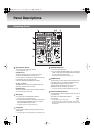
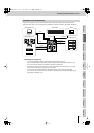
Bus A EFFECTS Buttons
These buttons turn effects on/off for the bus A image of the video
mixer. If an effect is on, the button will be lit or blinking.
You can use up to four effects simultaneously.
☞
“Using Effects” (p. 42)
* The EFFECTS button will blink if you’ve selected an effect that can be
controlled by the [CONTROL] fader ( ).
For details, refer to “Effects that can be controlled by the [CONTROL]
faders” (p. 42).
* Depending on the type of effect, there are some combinations that
cannot be used simultaneously. For details, refer to “Effects that Cannot
Be Used Simultaneously” (p. 107).
The settings listed below are the settings for memory number 1
of the [MEMORY] knob. By selecting memory numbers 2–8 you
can assign other effects to the EFFECTS buttons.
☞
“Assigning Different Effects to the EFFECTS Buttons” (p. 53)
Bus A [CONTROL] Fader
●
You can use this fader to control the settings of an effect
assigned to the blinking EFFECTS button.
☞
“Effects that can be controlled by the [CONTROL] faders” (p. 42)
●
If the [FADE] button ( ) is blinking, this will fade in/out the
bus A image.
The fade color is fixed at black.
☞
“Fading Out the Bus A / Bus B Image” (p. 31)
Bus A [FADE] Button
This button lets you use the bus A [CONTROL] fader to fade the
bus A image.
While the [FADE] button is blinking, operating the [CONTROL]
fader will fade in/out the bus A image.
☞
“Fading Out the Bus A / Bus B Image” (p. 31)
Bus A [TRANSFORMER] Button
This button switches between the bus A and bus B images
without using the video fader.
☞
“Using the [TRANSFORMER] Buttons to Switch Images” (p. 40)
Video Fader
This is a T-bar type video fader. It switches between the bus A
and bus B images.
☞
“Switching Between Two Images” (p. 35)
The video fader can be installed in the V-8 in either a vertical or
a horizontal orientation, and you are free to change this to suit
your preference.
☞
“Installing the Video Fader in the Most Convenient Orientation” (p. 76)
TRANSITION Buttons
Here you can select the way in which you will transition between
the bus A and bus B images. The button you’ve selected will light.
The settings listed below are for memory number 1 of the
[MEMORY] knob. By selecting memory numbers 2–8 you can
assign different transition effects to each TRANSITION button.
☞
“Switching Between Two Images” (p. 35)
[BPM SYNC] Button
This lets you automatically switch between images or turn effects
on/off in synchronization with the BPM (BMP Sync).
☞
“Switching Images in Synchronization with Music (BPM Sync)” (p. 60)
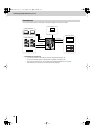
PREVIEW OUT SELECT Buttons
These buttons select the preview image that will be output from
the PREVIEW OUT connector (p. 13).
●
[1]–[PC/8] Buttons
The image being input to the INPUT 1–8/PC1/PC2 connector will
be sent from the preview output. The channel number or menu
(p. 23) will be shown overlaid on the preview output.
* The input from the S-video connector will take priority for channels 5–8.
* Use the [PC INPUT SELECT] switch to choose between the PC1/PC2
connector inputs.
* The menu will appear if you press the [MENU] button.
●
[OUTPUT] Button
The final output image will be sent from the preview output.
Information about the settings (p. 26) or the menu (p. 23) will be
shown overlaid on the preview output.
* The menu will appear if you press the [MENU] button.
[PC INPUT SELECT] Switch
This switches between the PC1 input and PC2 input.
[WHITE/BLACK] Switch
This selects either “white” or “black” as the fade color applied
when you operate the [OUTPUT FADE] fader.
[OUTPUT FADE] Fader
Lowering the [OUTPUT FADE] fader will fade out the image (final
output) being sent from the OUTPUT connector.
Raising the [OUTPUT FADE] fader will fade in the image.
☞
“Fading Out the Final Output” (p. 32)
●
OUTPUT FADE indicator
The indicator located above the [OUTPUT FADE] fader indicates
the fade status.
[1 (FEEDBACK)] button
Feedback (022: FEEDBACK
✽
)
[2 (NEGATIVE)] button
Negative (033: NEGATIVE
✽
)
[3 (COLORIZE)] button
Colorize (042: COLORIZE
✽
)
[4 (MULTI)] button
Multi (126: MULTI-HV
✽
)
[FADE] button Fade function
Blinking
On
Lit
On
Unlit
Off
[1 MIX] button
Dissolve (001: Mix01)
[2 WIPE] button
Wipe (008: Wipe03)
[3 EFX] button
Soft edge wipe (192: SWipe88)
WHITE
Fade to white
BLACK
Fade to black
Blinking
Now fading in/out
Lit
Normal output
V-8_e.book 11 ページ 2010年4月16日 金曜日 午後5時14分