


3INTRODUCTION
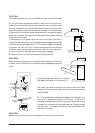
CAUTION:
To prevent personal injury, do not handle the main unit from the ends.
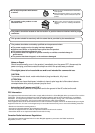
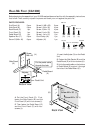
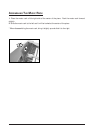
10. Insert the pedal connection cord that comes from Pedal
Board into the main unit’s pedal jack and fix with the clamp of
the Side Panel.
(E)
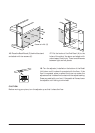
9. Attach the Speaker Cover (D) in front of
the speaker boxes with four screws (F).
11. Turn the adjuster (installed on the bottom of the Pedal Unit)
down until it makes firm contact with the floor. If the floor is
carpeted, place a spiked furniture cup under the adjuster so that
it makes firm contact with the carpet backing. Press any pedal
with your foot. If the pedal rail flexes, lower the adjuster until
flexing is minimized.
(D)
(F)
CAUTION:
Before moving your piano, turn the adjuster up so that it clears the floor.
(A)
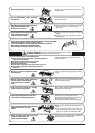
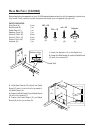
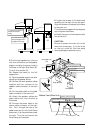
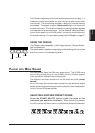
6. The next step requires one person on each end of the main unit.
Grasp the unit with both hands, one under the front, the other under
the rear (remember, not the end) and carefully center the main unit on
top of the stand so that the hook brackets located on the bottom rear
of the main unit are inside the stand side panels (A) and approximately
one-third of the rear, top edge of the side panels are exposed. (See the
illustration to the right)
7. Maintaining a firm grasp under the front of the main, unit slide it
toward the rear of the stand until the hook brackets engage the brackets
at the rear top of the side panels (A). This hook arrangement is design
to prevent the main unit from tilting forward while the screws are
installed. Keep one hand under the front of the main unit, push down
on the front to be certain that hooks are properly engaged.
8. Fasten the main unit and the stand with four screws (E).
CAUTION:
Be sure to secure the main unit to the stand with the screws. If you fail
to do so, the unit could fall from the stand causing damage or personal
injury.