


11
Sequencer
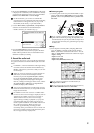
When you record or play back a song that contains
audio tracks, there will be a lag of several seconds from
the time you press the SEQUENCER [REC/WRITE]
key or the SEQUENCER [START/STOP] key until
recording or playback actually begins. A dialog box will
appear during this time, and the SEQUENCER [REC/
WRITE] key or the SEQUENCER [START/STOP] key
LED will blink.
I Press the SEQUENCER [START/STOP] key.
Recording will begin from the location you specified in
“Location.”
If you have specified a metronome precount (“Precount
[Measure]”), recording will begin after the precount.
J Press the SEQUENCER [START/STOP] key to stop
recording.
If you have already recorded performance data on the
MIDI tracks, these tracks can playback, while only the
external audio signal coming from the AUDIO INPUT
jack will be recorded onto the audio track.
■
Check the recorded content
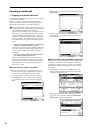
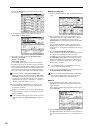
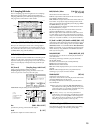
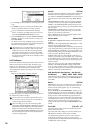
K In the Sequencer P0: Play/REC, Sampling/HD Audio
page, set “Ctrl” to Audio Track.
The audio track output settings will be shown in the
lower left of the screen.
L Set “AUDIO 1” to specify an output for audio track 1.
1 “Pan”: C064
2 “Level”: 127
3 “BUS (IFX/Indiv.) Select”: L/R
4 “S1,” “S2”: 000
5 “PLAY/MUTE/REC”: PLAY
6 “SOLO ON/OFF”: OFF
M Press the SEQUENCER [START/STOP] key to play back
the song.
If the MIDI tracks already contain recorded perfor-
mances, those MIDI tracks will also play back. If you
want to play back only the audio track, set the “SOLO
ON/OFF” to ON.
If you want to apply an insert effect to the audio track,
use “BUS (IFX/Indiv.) Select” to select IFX1–IFX5.
Then set the “BUS Select” that follows the insert effect
you are using to L/R. (☞p.15)
If you want to apply a master effect to an audio track,
use “S1” and/or “S2” to adjust the send level to the
master effect(s). If you are using an insert effect, adjust
“Send 1” and/or “Send 2” (8–3a ☞PG p.84) following
the insert effect.
3. Using punch-in recording
In this example, we’ll use punch-in recording to re-record a
portion of the track you recorded in “2. Record the audio
track.”
Leave the “Input” settings the same as you had set them in
the Sequencer P0: Play/REC, Sampling/HD Audio page.
■
Setup
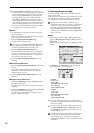
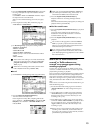
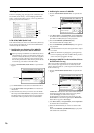
1 In the Sequencer P0: Play/REC, Preference page, make
sure that “Track Select” is set to Audio Track 1.
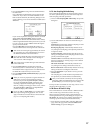
2 In the “Recording Setup” area, specify the recording
method.
In this example we will use punch-in recording.
“Punch In”: checked
“Punch In Mode”: Auto
“M***-M***”: Specify the range of measures that you
want to re-record.
“Bounce”: unchecked
“Source BUS”: Indiv. 1/2
“Overwrite.WAV”: unchecked
“Take”: checked
If you set “Punch In Mode” to Auto and specify the
desired range of measures in “M***–M***,” playback
will occur until you reach that range of measures, and
recording will occur only in the specified range.
If you set “Punch In Mode” to Manual, recording will
occur in the range you specify by pressing the
SEQUENCER [REC/WRITE] key or foot switch. If you
are using manual punch-in, press the SEQUENCER
[START/STOP] key to start playback. At the point
where you want to begin re-recording, press the
SEQUENCER [REC/WRITE] key or foot switch, and
recording will begin. At the point where you want to
stop re-recording, press the [REC/WRITE] key or foot
switch once again; recording will end, and playback
will resume.
By leaving “Overwrite.WAV” unchecked and setting
“Take” to checked as in the example above, you can
compare the previous recording with the result of your
punch-in recording. (☞p.12 “Compare the recorded
content”)
3
2
5
1
4
6