


64
■
Check the resampled data
• If you selected “Save to: RAM” (Convert to Program),
move to Program mode, select the newly created
program, and play the C2 on the keyboard to hear the
resampled result.
• If you selected “Save to: DISK,” use the page menu
command “Select Directory” to hear the results. (☞PG
p.7)
If you want to simultaneously sample an external audio
source from AUDIO INPUT etc. while you play the
combination, go to the Combination P0: Play, Sampling
page, and set Input 1, 2 “BUS (IFX/Indiv.) Select” to L/
R.
If you did not check “Convert to Program,” use Sam-
pling mode to select and play the sample to hear the
resampled result.
3. REC Audio Input
This automatically makes the appropriate settings for sam-
pling an external audio source while you monitor your play-
ing on a combination using the arpeggiator etc.
Use INDIV.1, 2 OUT to monitor the sound being sam-
pled. Connect the AUDIO OUTPUT MAIN L, R, INDIV
1, 2 jacks to your mixer and monitor the output.
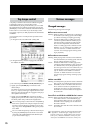
■
Setup
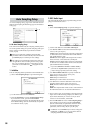
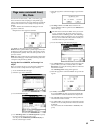
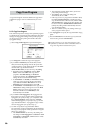
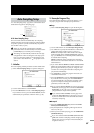
1 Select “Auto Sampling Setup” to open the dialog box.
2 Use the radio buttons to select REC Audio Input.
3 Use “Source Audio” to select the external audio input
source.
Analog: Selects the analog audio output of an instrument
or other audio source connected to the AUDIO INPUT 1
and AUDIO INPUT 2 jacks.
S/P DIF: Selects the digital audio output from an instru-
ment or DAT etc. connected to the S/P DIF jack.
mLAN: Selects the digital audio output of an instrument
or other device connected to the mLAN connector (if the
optional EXB-mLAN is installed). (☞PG p.4 “Input”)
If you select S/P DIF or mLAN for “Source Audio,”
you must set “System Clock” (Global P0 0–2a ☞PG
p.138) to the appropriate system clock setting.
4 Use “Mono-1/Mono-2/Stereo” to specify whether the
input source is mono or stereo. (☞PG p.4)
Mono-1: Input 1 will be used.
Mono-2: Input 2 will be used.
Stereo: Input 1 and 2 will be used in stereo.
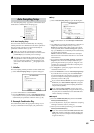
5 Use “Save to” to select the destination where the sam-
pled data will be written. (☞PG p.5 “Save to”)
RAM: The resampled data will be written into sample
memory (RAM). If the “Convert to Program” option in
step
6 is checked, a new multisample will automatically
be created after resampling.
DISK: The sampled data will be saved as a WAVE file on
the internal hard drive or an external SCSI hard drive.
6 If you selected “Save to: RAM,” checking “Convert to
Program” will convert the resampled data into a pro-
gram using the number you specify in “Program.” You
can then move to Program mode after resampling and
play the data immediately.
7 Use “Program” to specify the program where the con-
verted data will be saved.
8 Press the OK button to execute “Auto Sampling Setup.”
If you decide not to execute, press the Cancel button.
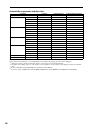
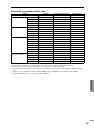
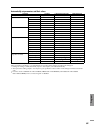
(For the automatically-set parameters and their values,
☞p.65.)
If you selected “Save to: RAM” and want to change the
RAM bank, use the page menu command “Select Bank
& Smpl No.” (Program 0–3C ☞PG p.6) to specify the
sampling-destination sample memory (RAM).
If you selected “Save to: DISK,” you can use the page
menu command “Select Directory” (Program 0–3D
☞PG p.7) to specify the save-destination for the WAVE
file that will be created by sampling.
■
Sampling
9 Start playing the combination that uses the arpeggiator
etc.
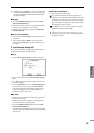
0 Press the SAMPLING [REC] key and then the SAM-
PLING [START/STOP] key.
A Play the instrument etc. that is connected to the AUDIO
INPUT jack you specified in “Source Audio.”
B When you are finished playing, press the SAMPLING
[START/STOP] key.
If you selected “Save to: RAM” (Convert to Program)
and continue sampling without changing the settings,
the newly-created samples will be automatically
assigned to C#2, D2, …
■
Listen to the sampled data
• If you selected “Save to: RAM” (Convert to Program),
move to Program mode, select the newly created
program, and play the C2 key to hear the sample.
• If you selected “Save to: DISK,” use the page menu
command “Select Directory” (☞PG p.7) to hear the
sample.
If you want to apply an insert effect to the input source,
go to the Combination P0: Play, Sampling page, and set
Input 1,2 “BUS (IFX/Indiv.) Select” to IFX1–IFX5. Set
the “BUS Select” that follows the insert effect you used
to 1/2.
If you did not check “Convert to Program,” select and
play the sample in Sampling mode to hear it.
Add the contents of “0–5E: Auto Sampling Setup” to the
explanation in “Parameter Guide” Combination mode 0–5:
Sampling Page Menu Command (
☞
PG p.37).