


23
Sequencer
To hear the sound of the specified region, press the
SAMPLING [START/STOP] key. The region specified
by “Start” and “End” will play back when you press the
SAMPLING [START/STOP] key.
9 If you press the Stretch button, the Time Stretch dialog
box will appear, and you can re-do the time stretch once
again. Execute Time Stretch as described in step
5 and
6.
0 Save the time stretched data. Press the Save button to
display the Save dialog box.
A If you check “Overwrite.WAV” the results of executing
the command will overwrite the WAVE file assigned to
the audio track. If this is not checked, executing the com-
mand will create a new WAVE file, and the audio track
assignment will be updated, and replaced by the newly
created WAVE file. If a new file will be created, use
“Name” to specify a name for the file.
The page menu command “Sel Dir/WAVE (Audio
Track)” specifies the save-destination of the newly cre-
ated WAVE file.
B To save, press the OK button. If you decide not to save,
press the Cancel button.
By repeating steps
9–B you can create more samples as
desired.
C Press the Exit button to exit the Time Stretch operation.
5–1W: Transfer WAVE (Transfer WAVE To MIDI Track)
Using this command, the WAVE file assigned to the audio
track can be re-assigned to a MIDI track.
The WAVE file will be loaded into sample memory (RAM),
and sample, multisample, and program data will be created
automatically. The automatically created program will be
assigned to a MIDI track, and note data will be automati-
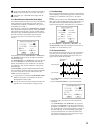
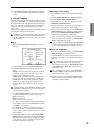
cally created on that MIDI track. (See diagram below.)
When you play back after executing this command, the per-
formance previously played by the audio track will be
played back by the MIDI track. You can use Sampling mode
commands such as Time Slice to edit the data in sample
memory (RAM).
By using this command to transfer an audio track perfor-
mance to a MIDI track, you can free up the audio track(s) for
recording other instruments.
1 Use “Track Select” to select the audio track whose per-
formance you will transfer to a MIDI track.
2 Choose “Transfer WAVE” to open the dialog box.
3 In the “From: Audio Track” field, select the audio track
that you want to transfer to a MIDI track.
4 Specify the destination song number in the “To: Song”
field, the destination track in “Track,” and the number of
the automatically-created program in “Program.”
5 To execute “Transfer WAVE,” press the OK button. If you
decide to cancel, press the Cancel button.
The multisample and sample(s) will automatically be cre-
ated in vacant numbers. A program will be automatically
created in the number you specified for “Program,” and
assigned to the song track you specified in “Song” and
“Track.” Then the appropriate note data will be automat-
ically created in the track.
If a single track exceeds 16 Mbytes, the WAVE file will
automatically be divided.
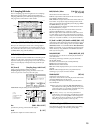
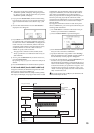
HD Audio Track 1
HD Audio Track 2
MIDI Track 1
MIDI Track 16
001.01.000
016.04.191
001.01.000
Example of using Transfer WAVE to MIDI Track: From Audio Track: 1&2, To Track: 1, Program: I-E000
Stereo WAVE file
Example:
40 MB [20 MB (L) + 20 MB (R)]
Guitar 1 (Mono)
Guitar 2 (Mono)
16MB→RAM1
Stereo file
C2
C#2
[I-E000]
Song (16 measures)
16MB→RAM2
4MB→RAM3
4MB→RAM3
C2 C#2
Sample is automatically
created
Multisample is
automatically created
Program is automatically
created
Appropriate note data is
automatically created