


29
Sequencer
If “Convert to Program” is not checked, you can listen
to the sample by selecting and playing it in Sampling
mode.
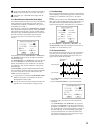
3. In-Track Sampling
The In-Track Sampling function samples an external audio
signal from AUDIO INPUT etc. into sample memory (RAM)
in synchronization with song playback, and also automati-
cally creates note data in a MIDI track. The sampled audio
data can easily be played from the MIDI track or edited.
(☞BG p.115)
The “In-Track Sampling” radio button automatically makes
the appropriate settings for this function.
Use INDIV. 1/2 OUT to monitor the audio signal being
recorded. Connect the AUDIO OUTPUT MAIN L, R,
INDIV1, and 2 jacks to your mixer so that you can mon-
itor the output.
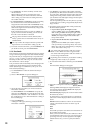
■
Setup
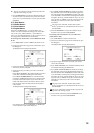
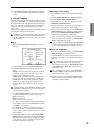
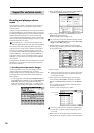
1 Select “Auto Sampling/HD Audio Setup” to open the
dialog box.
2 Use the radio buttons to select In-Track Sampling.
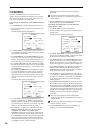
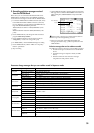
3 In “Source Audio,” select the external audio input
source.
Analog: Selects the analog audio signal from a musical
instrument or other device connected to the AUDIO
INPUT 1 and AUDIO INPUT 2 jacks.
S/P DIF: Selects the digital audio signal from an instru-
ment or DAT deck etc. connected to the S/P DIF jack.
mLAN: Selects the digital audio signal from an instru-
ment etc. connected to the mLAN connector (if the
optional EXB-mLAN is installed). (☞PG p.4, PG p.56
“Input”)
If “Source Audio” is set to S/P DIF or mLAN, set “Sys-
tem Clock” (Global P0: 0–2a ☞PG p.138) to the appro-
priate system clock setting.
4 Use “Mono-1/Mono-2/Stereo” to specify the mono/ste-
reo status of the input source. (☞PG p.4, PG p.56)
Mono-1: Use Input 1.
Mono-2: Use Input 2.
Stereo: Use Input 1 and 2 in stereo.
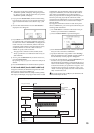
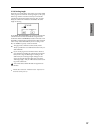
5 Use “To” to select the MIDI track that will be used for in-
track sampling. Note data will automatically be created
in the MIDI track you select.
6 Use “Program” to specify the program that will be cre-
ated. After sampling, a new multisample will automati-
cally be created, and the sampled data will be converted
into a program.
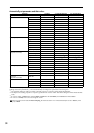
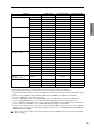
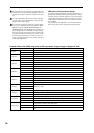
7 Press the OK button to execute “Auto Sampling/HD
Audio Setup.” If you decide to cancel, press the Cancel
button. (For the automatically-set parameters and their
values, refer to p.32. For an example of using the auto-
matically-set parameters ☞BG p.115)
■
Performing in-track sampling
8 Use “Location” to specify the playback location of the
song.
9 Press the SAMPLING [REC] key. (Sampling-standby)
0 Press the SEQUENCER [START/STOP] key.
A At the moment you want to start sampling, press the
SAMPLING [START/STOP] key.
B Play the instrument or other source you connected to the
AUDIO INPUT jack selected in “Source Audio.”
C When you are finished playing, press the SAMPLING
[START/STOP] key. (Only sampling will stop.) Alterna-
tively, press the SEQUENCER [START/STOP] key.
(Song playback and sampling will both stop.)
If you want to continue sampling while the song plays,
turn the Global P0: Input/Sampling “Auto Optimize
RAM” setting Off. (☞PG p.140)
If you set “Save to” to RAM (Convert to Program) and
continue sampling without changing the settings, the
samples will be automatically assigned to C#2, D2, ...
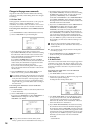
■
Listen to the sampled data
• Move the “Location” back, and press the SEQUENCER
[START/STOP] key to play back the song.
• Use “Track Select” (0–1a ☞PG p.50) to select the track
specified in “To” (step
5), and play the C2 note of the
keyboard.
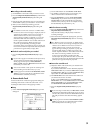
If you want to apply an insert effect to the input source,
go to the Sequencer P0: Play/REC Sampling/HD
Audio page and set Input 1, 2 “Bus (IFX/Indiv.) Select”
to IFX1–IFX5. Set the “BUS Select” following that
insert effect to 1/2.
If you set “Trigger” (0–7b ☞PG p.56) to Threshold,
sampling will begin when the input level exceeds the
specified value. (☞BG p.115)
Use the page menu command “Select Bank & Smpl
No.” (0–7A ☞PG p.56) to select the sampling-destina-
tion sample memory (RAM).