


35
Sequencer
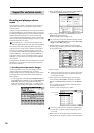
2. Recording exclusive messages received
from the TRITON-Rack
Here’s how you can connect the TRITON STUDIO and a
TRITON-Rack via MIDI, and use the TRITON STUDIO to
record exclusive messages received from the TRITON-Rack.
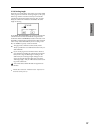
1 Connect the TRITON-Rack’s MIDI connectors (IN/OUT)
to the TRITON STUDIO’s MIDI connectors (OUT/IN).
On each TRITON, go to the Global mode MIDI Filter set-
tings and check the Exclusive parameter.
TRITON-Rack: GLOBAL 2.1: MIDI, MIDI Filter (☞PG
p.112)
TRITON STUDIO: Global P1: MIDI, MIDI Filter (☞PG
p.144)
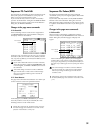
2 On the TRITON-Rack, enter Program mode and select
program A000: Noisy Stabber.
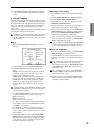
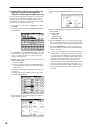
3 On the TRITON STUDIO, enter Sequencer mode. In
“Song Select,” create a new song. (☞PG p.50)
4 In “Track Select,” choose Track 01 and begin recording.
5 On the TRITON-Rack, edit the “PROG P1.1 Arp.Play:
Pattern” parameters.
6 Stop recording.
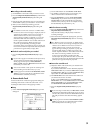
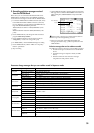
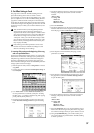
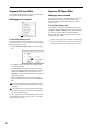
7 On the TRITON STUDIO, select the Sequencer P5: Track
Edit page menu command “Event Edit.” In the Set Event
Filters dialog box, check Exclusive and press the OK
button.
Each exclusive message is recorded at the location in
the song where it began being received.
8 When you play back on the TRITON STUDIO, the
changes you made in step
5 will be reproduced on the
TRITON-Rack.
Exclusive messages that can be realtime-recorded
The following exclusive messages can be realtime recorded.
• Exclusive messages received from an external MIDI
device
• Parameter changes in Sequencer mode (see table
below)
• Master Volume universal exclusive messages
assigned to the foot pedal or a knob
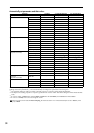
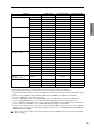
Parameter change messages that you can realtime-record in Sequencer mode
*1: “SOLO ON/OFF” is always controlled by events in the track, regardless of the play/mute status of that track.
Event indication
Location
Front panel/Page Parameter
Front panel
ARPEGGIATOR [ON/OFF] key, [GATE] knob, [VELOCITY] knob
REALTIME CONTROLS [REALTIME CONTROLS] key
P0: Play/REC
Prog. 1-8/9-16 “Category,” “Program Select,” “PLAY/MUTE/REC,” “SOLO ON/OFF”
*1
Mixer 1-8/9-16 “Pan,” “Volume”
Sampling/HDAudio “Pan,” “Volume,” “BUS,” “Send1,” “Send2,” “PLAY/MUTE,” “SOLO ON/OFF”
P2: Trk Param
OSC 1-8/9-16 “Force OSC Mode,” “OSC Select,” “Portamento”
Pitch 1-8/9-16 “Transpose,” “Detune,” “Bend Range”
Other 1-8/9-16 “Delay,” “Use Program’s Scale,” “Type,” “Key,” “Random”
P4: Zone/Ctrl
Controller “SW1,” “SW1 Mode,” “SW2,” “SW2 Mode,” “Knob 1-B”...“Knob 4-B”
MOSS 1-8/9-16 “Voice Allocation Reserve,” “Reference Track”
P5: Track Edit
Tone1.2 1-8/9-16
“Destination,” “Value”Tone3.4 1-8/9-16
Tone5.6 1-8/9-16
P7: Arpeggiator
Setup 1-8/9-16 “Arpeggiator Assign,” “Arpeggiator Run A, B”
Arpegg. A/B “Pattern,” “Octave,” “Resolution,” “Gate,” “Velocity,” “Swing,” “Sort,” “Latch,” “Key Sync.,” “Keyboard”
Scan Zone “Top Key,” “Bottom Key,” “Top Velocity,” “Bottom Velocity”
P8: Insert Effect
Routing 1-8/9-16 “BUS Select,” “Send1,” “Send2”
Insert FX “IFX1”...“IFX5,” “IFX1 On/Off”...“IFX5 On/Off,” “Chain,” “Pan,” “BUS Sel.,” “Send1,” “Send2”
IFX 1/2/3/4/5 All effect parameters
P9: Master Effect
Master FX
“MFX 1,” “MFX 2,” “MFX1 On/Off,” “MFX2 On/Off,” “Chain,” “Chain Direction,” “Chain Signal,” “Chain
Level,” “Return 1, “Return 2,” “Low,” “Mid,” “High”
MFX 1/2 All effect parameters
Master EQ
“Low Cutoff,” “Mid Cutoff,” “Q,” “High Cutoff,” “Gain,” “Low Gain Mod-Src,” “High Gain Mod-Src,” “Ctrl
Ch”