


|
15
Axiom Pro User Guide
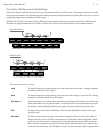
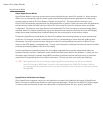
Rear Panel Overview
20
13
17 18 19
14 15 16
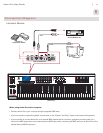
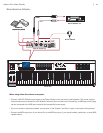
13. Expression Pedal Input (Expr):Connectyourexpressionpedal’s1/4”connectortothisjack.
14. Sustain Pedal Input:Connectyoursustainpedal’s1⁄4”connectortothisjack.TheAxiomProkeyboardsupportsall
sustain pedal polarities by auto-sensing the pedal’s orientation during startup.
15. MIDI Out Port: This standard 5-pin MIDI connector transmits signals to any MIDI compatible device such as a synthesizer,
sound module, or drum machine.
16. MIDI In Port: This standard 5-pin MIDI connector accepts signals from any MIDI compatible device such as a synthesizer
or drum machine.
1 7. USB Port:TheUSBporthandlesallcommunicationbetweenAxiomProandyourcomputer.Connectthisjacktoan
available USB port on your computer.
✓ NOTE: When using the USB connection, the controller is powered via the host computer
and a power adapter is not required. Also note that USB hubs (particularly USB hubs that
do not have a dedicated external power supply) may result in inadequate power being sent
to Axiom Pro and are not recommended for use with M-Audio products.
18. Power Socket: Connect an optional 9V DC, 500mA power supply here. Note that a power supply is not necessary if
Axiom Pro is connected to a computer through a USB connection.
19. Power Switch: This switch turns the controller on and off.
20. Kensington
®
Lock Connector: Connect a standard laptop-style locking security cable here to protect your Axiom Pro
from theft.