


E-33
Applying Effects to Tones
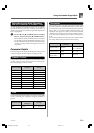
DSP Parameters
The following describes the parameters for each DSP.
DSP
■
Parameter 0 to 7
These parameters differ in accordance with the algorithm*
of the selected DSP type. See the “Effect List” on page A-
17 and the “DSP Algorithm List” on page A-19 for more
information.
* Effector structure and operation type
■
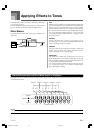
DSP Reverb Send (Range: 000 to 127)
Specifies how much of the post-DSP sound should be sent
to reverb.
■
DSP Chorus Send (Range: 000 to 127)
Specifies how much of the post-DSP sound should be sent
to chorus.
NOTE
• Whether or not an effect is applied to the parts that are
sounding also depends on Mixer Mode Reverb Send,
Chorus Send, and DSP on/off settings. See “Mixer
Function” on page E-47 for more information.
• Playing a demo tune (page E-12) automatically changes
the effect to the one that is assigned to the tune. You
cannot change or cancel a demo tune effect.
• Changing the effect setting while sound is being output
by the keyboard causes a slight break in the sound when
the effect changes.
• A number of tones, called “Advanced Tones”,
automatically turn on the DSP line for richer, higher
quality sound. If you assign an Advanced Tone to a
keyboard part (Channels 1 through 4), the DSP line turns
on automatically and the DSP selection changes in
accordance with the settings of the Advanced Tone. Also,
the Mixer Mode DSP line on/off setting for the keyboard
part to which the Advanced Tone is assigned is turned
on.*
* The Mixer DSP line setting is automatically turned off
for each part that does not have an Advanced Tone
assigned.
Because of this, DSP effects previously applied to
these parts are cancelled, which can make their tone
sound different. In this case, display the Mixer screen
and turn DSP back on.
Saving the Settings of DSP
Parameters
You can save up to 100 modified DSPs in the user area for
later recall when you need them.
NOTE
• User DSP areas 100 through 199 initially contain the
same data as DSP types 000 through 099.
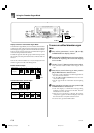
1
After making the DSP parameter settings you want,
press the [̄] CURSOR button.
• This causes the DSP number of the user area where
the DSP will be saved to flash on the display.
2
Use the [+] and [–] buttons to select the user area
DSP number where you want to save the new DSP.
• You can select a user area DSP number in the range of
100 to 199 only.
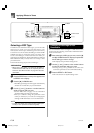
3
After the user DSP area number you want is
selected, press the [̈] CURSOR button.
• Use the [+] and [–] buttons to scroll through letters at
the current cursor location.
• Use the [̇] and [̈] CURSOR buttons to move the
cursor left and right.
• See the page E-103 for information about inputting
text.
4
After everything is the way you want, press the [̄]
CURSOR button to store the effect.
• This will display a confirmation message asking
whether you really want to save the data. Press the
YES button to save the data.
• The message “Complete” appears momentarily on the
display, followed by the tone or rhythm selection
screen.
735A-E-035A
WK3000_e_26-37.p65 03.4.8, 11:5133