


64
System Settings (EDIT Mode)
Here’s how to specify whether MIDI CLOCK will be transmitted.
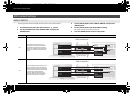
1 Simultaneously press the [ACT] button and the [ ] button.
2 Use the [VALUE] knob to select “MIDI CLOCK,” and press the [ENTER]
button.
3 Use the [VALUE] knob to select “MIDI CLK ON/OFF,” and press the
[ENTER] button.
4 Use the [VALUE] knob to select “ON” or “OFF.”
5 Press the [ENTER] button to return to Play mode.
This setting specifies the default MIDI clock value when “MIDI CLOCK ON/OFF” is On.
After you turn on the power, this tempo will be output until you move the VALUE
controller to which Tempo is assigned.
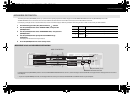
1 Simultaneously press the [ACT] button and the [ ] button.
2 Use the [VALUE] knob to select “MIDI CLOCK,” and press the [ENTER]
button.
3 Use the [VALUE] knob to select “DEFAULT TEMPO,” and press the
[ENTER] button.
4 Use the [VALUE] knob to specify the MIDI CLOCK DEFAULT TEMPO
value in a range of 20–250.
The display will indicate the value you specified.
5 Press the [ENTER] button to return to Play mode.
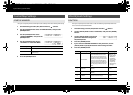
This setting specifies the port from which MIDI clock will be output when “MIDI CLOCK
ON/OFF” is On.
1 Simultaneously press the [ACT] button and the [ ] button.
2 Use the [VALUE] knob to select “MIDI CLOCK,” and press the [ENTER]
button.
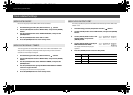
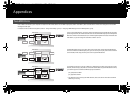
fig.lcd-CLKOUTPUTPORT.eps
3 Use the [VALUE] knob to select “CLK
OUTPUT PORT,” and press the
[ENTER] button.
fig.lcd-CLKOUTPUTPORT1.eps
4 Use the [VALUE] knob to specify the
MIDI CLOCK OUTPUT PORT.
The display will indicate the port you
specified.
5 Press the [ENTER] button to return to Play mode.
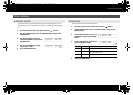
Clock-related Settings
MIDI CLOCK ON/OFF
MIDI CLOCK DEFAULT TEMPO
MIDI CLOCK OUTPUT PORT
Number Setting Explanation
1 PORT 1 MIDI CLOCK will be transmitted from “A-PRO 1.”
2 PORT 2 MIDI CLOCK will be transmitted from “A-PRO 2.”
3 1AND2
MIDI CLOCK will be transmitted from “A-PRO 1” and “A-PRO 2.”
A-300_500_800C_e.book 64 ページ 2010年2月22日 月曜日 午後9時13分