


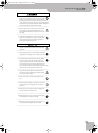
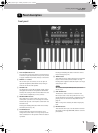
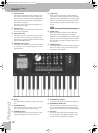


Front panel
Backing Keyboard BK-5
r
13
If the button’s indicator doesn’t light, the rhythm,
Songs and the 3 real-time parts use their normal
pitch.
Pressing and holding this button locks the key (see
p. 54).
V
TRACK MUTE/CENTER CANCEL button
This button lets you mute the accompaniment parts
of the selected rhythm, so that only the bass and
drum parts are played back. It also lets you mute the
melody part of the selected MIDI File, or attenuate
the vocal part at the center of an audio file (WAV or
mp3), allowing you to sing or play that part yourself.
Pressing and holding this button calls up a display
page where you can select the Standard MIDI File or
rhythm part(s) that you don’t want to hear.
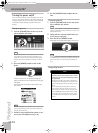
W
USB MEMORY button
Press this button to call up a list of the files stored on
the USB memory connected to the BK-5‘s USB MEM-
ORY port.
X
USB MEMORY port
Connect an optional USB memory here.
Note: Roland does not recommend using USB hubs, irre-
spective of whether they are active or passive. Please con-
nect only one USB memory to this port.
NOTE
Use USB memory sold by Roland. We cannot guarantee
operation if any another USB memory is used.
Y
MENU button
This button allows you to open the BK-5’s menu page
where you can view and select all available functions.
Press it together with the [EXIT] button to listen to
the BK-5’s demo songs.
Z
EXIT button
This button is used to return to a higher menu level.
Press and hold it to return to the BK-5’s main display
page.
a
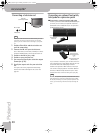
SPLIT button
This button is used to activate Split mode. While its
indicator lights, notes played to the left of the C4 on
an keyboard trigger the LWR part. Notes to the right
of the split point, on the other hand, trigger the UP1
and UP2 parts. See “Using Split mode” on p. 43.
b
PART LWR and UP2 buttons
These buttons are used to switch the real-time parts
(Lower and Upper2) on and off.
NOTE
The Upper1 part (UP1) is always active and cannot be
switched off.
c
ONE TOUCH button
This button is used to enable the recall of One Touch
memories. Pressing and holding it calls up a display
page where you can edit and save One Touch memo-
ries.
NOTE
Use the TONE buttons [1]~[4] to select or deselect a One
Touch memory (see p. 31).
d
MELODY INTELL button
This buttons is used to add an automatic counter-
melody (second or third voice) to your solos or melo-
dies. Pressing and holding it calls up a display page
where you can view the “Melody Intelligent” parame-
ter.
e
NUMERIC button
Press this button if you want to use the TONE buttons
f to enter numeric values (see p. 25).
f
TONE buttons (Tone selection)/[0]~[9] (numeric but-
tons)
These buttons allow you to select Tones by category
(page 24).
You can also use them to input numeric values. To do
so, first activate the NUMERIC button e.
Pressing and holding any of these buttons locks the
Tone (page 54).
BK-5_US.book Page 13 Monday, November 14, 2011 12:43 PM