


Maintenance Application 71
© 2005 TOSHIBA TEC AMERICA AMERICA RETAIL SYSTEMS, INC. R1.0a
better cost if you order more.
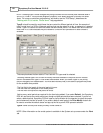
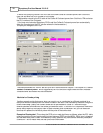
Note:
Each Cost break record MUST HAVE both start and end dates to be valid. If both dates have not
been selected, the system will prompt you before leaving the record.
·To add a cost break for an item's vendor, enter the purchasing quantity specified by the vendor in the
"Quantity break" field. You will be prompted with a calendar to enter the start date for the cost break.
·To add additional cost breaks for the same vendor, use the "+" button within the Cost break section, or
hold down the [
Ctrl
] key and press [
A
].
·If there is more than one vendor for an item, and they all have cost break information, use the black
left and right black arrow buttons at the top of the
Regular Cost
section to move to the next or previous
vendor. The
Cost break
information changes to reflect that vendor's cost breaks. Then, use the black
left and right black arrow buttons at the top of the
Cost break
section to move to the next or previous
cost break for the selected vendor.
·To remove a cost break from an item, select the appropriate vendor from the Regular cost section,
then select the cost break information to remove and press the scissor button at the top of the Cost
break section. Accept the prompt that appears asking if the cost break information should be removed
from this vendor for this item.
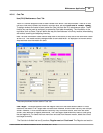
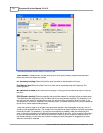
Quantity Break:
The quantity break field is used to enter the case quantities (
or units if purchased that
way
) that must be purchased from this vendor to obtain the cost break. Remember that you can have
different levels of Cost breaks from each vendor. For example if you purchase between 10 and 20
cases, the vendor offers a certain cost, but between 20 and 30 cases, there is a better cost. Each cost
break level is programmed to reflect the purchasing information.
From / To:
Both the from and to fields
must contain
valid dates for the cost break offer. Double click
the date fields to open a calendar utility, making date selection easy. You can also enter the dates
manually, keeping in mind that the date format for these fields follows the Windows "Regional settings"
setup for date formats on the host computer.
$ Discount:
Enter the discount amount in dollars, if the vendor offers a dollar based discount for this
cost break.
% Discount:
Enter the discount amount as a percentage, if the vendor offers a percentage based
discount for this cost break.
Unit Cost:
The Unit cost field is the
calculated cost
per unit based on the information entered above.
You cannot edit this field directly, and appears as a confirmation. This field is handy to quickly see the
difference between the
Regular Cost
unit price, and the
Cost break
unit cost.
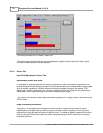
4.6.1.7 Inventory Tab
Item (PLU) Maintenance: Inventory
Tab
Using the inventory feature
The system can track inventory levels to assist the ordering and receiving process. The first step is to
define whether stock on hand and reordering is being used on the item. These settings are available in
the PLU maintenance. The inventory settings are located in the same column as the regular retail price
on level 1. Note that changing to another level does not affect the inventory settings you make. All price
levels share the same stock on hand.
The table below shows the fields that can be defined in regards to the inventory tracking for each item.
There are four fields to define.