


144
Using the Fade function
LS9-16/32 Owner’s Manual
2
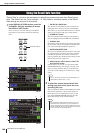
Make sure that the cursor is located some-
where other than the constant display area,
and use the dial or the [DEC]/[INC] keys to
select the scene for which you want to
make Fade function settings.
3
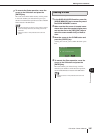
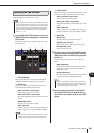
Move the cursor to the SET popup button,
and press the [ENTER] key to access the
FADE TIME popup window.
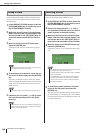
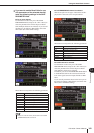
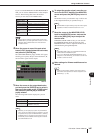
In this popup window you can select the channels to
which Fade will be applied, and adjust the fade time.
1 Channel display field
The channels to which Fade is applied are highlighted.
B FADE TIME knob
This knob sets the fade time. Move the cursor to this
knob and use the dial or the [DEC]/[INC] keys to
adjust the setting.
C SET ALL button
If you press this button, the Fade effect will be enabled
for all faders/encoders of that scene.
D CLEAR ALL button
If you press this button, the Fade effect will be dis-
abled for all faders/encoders of that scene.
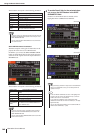
4
Press the [SEL] keys of the desired chan-
nels to select the channels to which the
Fade effect will be applied (multiple selec-
tions are allowed).
The [SEL] keys of the selected channels will light, and
those channels will be highlighted in the channel dis-
play field of the popup window. You can cancel a
selection by pressing a lit [SEL] key once again to
make it go dark.
5
Move the cursor to the FADE TIME knob,
and use the dial or the [DEC]/[INC] keys to
adjust the fade time.
The range is 0.0 sec–60.0 sec.
When you’ve finished making settings, move the cur-
sor to the OK button and press the [ENTER] key to
close the FADE TIME popup window.
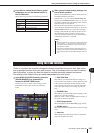
6
To turn on the Fade function, move the cur-
sor to the FADING button and press the
[ENTER] key.
The Fade on/off setting is made individually for each
scene. Save the scene if necessary.
7
Make Fade function settings for other
scenes as described in steps 2–6.
8
Recall a scene for which the Fade function
is turned on.
The faders will begin to move immediately after
Recall occurs, and will reach the values of the recalled
scene over the course of the specified fade time.
123
4
• The fade time you specify here is used for all channels
selected in step 4.
HINT
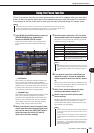
• Scenes for which Fade settings are made are shown by a
“FADING” indication in the STATUS field of the SCENE LIST
screen.
HINT
• The Fade function settings can be applied individually even if
faders are linked by Channel Link.
NOTE
• If you stop a moving fader while you hold down the corre-
sponding [SEL] key, the fade effect will stop at that point.
• If you recall the same scene while faders are moving, all
channel faders will move immediately to their target positions.
HINT