


96
Changing the output patching
LS9-16/32 Owner’s Manual
2
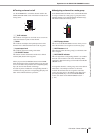
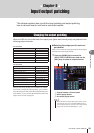
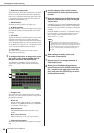
Move the cursor to the PATCH popup button
in the screen, and press the [ENTER] key.
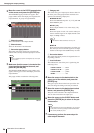
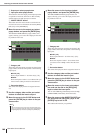
The HA/PATCH popup window will appear. This
popup window shows the output port assigned to the
output channels, in groups of eight channels.
1 Channel number
This is the number of the output channel.
B Channel name
These are the names of each channel.
C Port select popup button
This button selects the output port assigned to the
channel. The currently selected output port is shown.
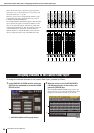
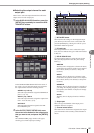
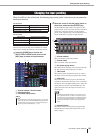
3
Make sure that the cursor is located at the
output port for the desired channel, and
press the [ENTER] key.
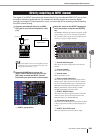
The OUTPUT PORT SELECT popup window will
appear, allowing you to select the output port for the
output channel.
This popup window contains the following items.
1 Category tab
This selects the type of output ports that are shown in
the lower part of the popup window. Each tab corre-
sponds to the following output ports.
● OMNI/2TR OUT
Shows the OMNI OUT jacks 1–8 {1–16} and 2TR
OUT DIGITAL jack.
● SLOT {1/2}
Shows output channels 1–16 of the slot(s) {1/2}.
● RACK
Shows the inputs of racks 1–8. Use this when you
want to send the signal of an output channel to the
input of a GEQ or effect.
● REC IN
Shows the input of the USB memory recorder. Use
this when you want to send the signal of an output
channel to the input of the USB memory recorder.
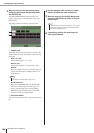
B Port select button
This selects the output port that is assigned to the cor-
responding channel.
C Level indicator
This indicates the state of the port’s signal using the
following colors.
• -60 dB or below........... black
• -60 dB to -18 dB .......... green
• -18 dB to 0 dB.............. yellow
•OVER............................ red‘
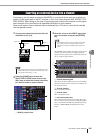
4
Move the cursor to the desired tab in the
upper part of the window, and press the
[ENTER] key.
The type of ports shown in the lower part of the win-
dow will change according to the tab you selected.
5
Move the cursor to the desired port select
button, and press the [ENTER] key.
That port will be selected as the output destination.
You can select more than one output port.
6
Move the cursor to the CLOSE button and
press the [ENTER] key to return to the pre-
vious screen.
7
If necessary, perform the same steps for
other output channels.
1
2
3
•Even if multiple output ports are assigned, only one output
port is shown.
HINT
1
2
3
LS9-16
•For details on GEQ and effects, refer to p.157.
HINT
• As an alternative to using the CLOSE button, you can return
to the previous screen by pressing the SELECTED CHAN-
NEL section [HOME] key once.
HINT