


User’s Guide – version 3.1.3 NetFlow Tracker
60
I
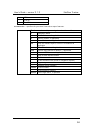
f you are unable to change the configuration of the router or switch, or if an interface
is asynchronous, you can override the description or inwards and outwards speed used
in reports here. You can also supply interface descriptions and speeds for a non-SNMP
c
ompatible device. You should note that if the speed or description supplied by the
device changes between SNMP scans NetFlow Tracker uses that speed or description,
even if you have previously overridden it. Thus the most recently set description or
speed is used, whether it was set on the device or within NetFlow Tracker.
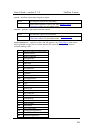
If you wish to prevent interfaces that never report any NetFlow data from appearing in
the interface status report
and Filter Editor check the box corresponding to the
interface in the “inactive” column. If the configuration of the device has changed there
may be some unused interfaces listed separately; it is likely you will want to mark these
as inactive.
Archiving
You can choose to archive old real-time data for the device rather than delete it by
checking “Archive real-time data”. See Archiving
for more information.
Traffic Classes
Some types of device can export information about the traffic class used to help route
the traffic involved in each flow. Currently some Cisco devices and Packeteer devices
support this feature; see Appendix 1
for required configuration. If the device offers
enough information via SNMP or other means to automatically detect the name of
each traffic class the “Automatically map traffic classes” option will be available and
checked; it is recommended that you leave this setting as it is. If you uncheck this
option or it is not available for a device, you must add each traffic class to NetFlow
Tracker if it is not already added and configure a map from the device’s class ID to the
NetFlow Tracker traffic class for each class on each device. To add traffic classes, click
on “add/delete” in the heading of the traffic class box for any device. You will then be
able to add traffic classes; you must give each one a unique identifier that will be used
if you create a URL with a traffic class filter (see Filter Parameters
). Note that this
identifier does not need to be the same as the identifier exported by any of your devices
for the traffic class.
Once you have added the traffic classes your devices use you must configure mappings
from the number the device uses to identify a traffic class to the actual traffic class you
added. To do this, enter the device’s class ID, select the relevant traffic class and click
“Add” for each class exported by the device.
Identified Applications
Identified applications are very like traffic classes and are configured in the same way.
Unlike a traffic class, which is used by the device to block or apply QoS settings to
traffic, an identified application is an accounting tool. Currently only Packeteer devices
support this feature; see Appendix 1
for required configuration. Similar to traffic
classes, you can choose to disable automatic mapping of identified applications; this is
not recommended.