


52
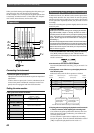
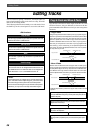
Special Application (Digital Recording)
INPUT 3
R MON OUT L
R ST OUT L
AUX RTN 1
R MONO/L
AUX RTN 2
R MONO/L
2 AUX SEND 1
4 INSERT 3
INPUT 4
SCSI
OUTIN
DATA
R
RECORDER IN
LIN
MIDI
OUT
PUNCH
IN/OUT
DATA
MIDI
POWER
OPTICAL OUT
DATA IN
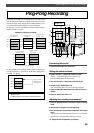
Digital recording from an external digital device
This chapter describes how to digitally record data from a
connected digital device (CD, MD, DAT, etc.) to tracks on
the FD-4.
Use the “Setting digital input tracks” menu in SETUP mode
to assign incoming digital signals (L, R) to a track.
The currently-selected Program will be used for digital re-
cording. The digital input track assignment is shared by all
existing Programs.
Digital Recording
Selecting a Program to record
1. If multiple Programs exist, first select the desired Program
using the Program Change function.
• See page 36 for more information on Program Change.
Setting a recording track
2. Select the desired track using the “Setting digital input tracks”
menu in SETUP mode.
When a track is assigned and a correct digital signal is
input, the FD-4 displays [DIGITAL] on the display.
If incoming digital signal is abnormal, the [DIGITAL]
indicator flashes. Refer to “Setting digital input tracks” in
the “Changing the Initial Settings (SETUP Mode)” chapter
on page 91.
<Note>
The “Setting digital input tracks” menu has Real tracks 1–4 and
Additional tracks L (indicated as 5) and R (indicated as 6) as op-
tions. However, you can record digital data to Additional tracks if the
disk’s recording mode is Normal or Mastering 1. If the disk is format-
ted in Mastering mode 2, you cannot record data on the Additional
tracks. If you try to record data on the Additional tracks using the
disk in Mastering mode 2, an error message [Can’t Rec!] appears
and the operation is ignored.
<Note>
When you are using a disk in Normal mode, input a digital source
with a sampling rate of 32kHz. When you are using a disk in Mas-
tering mode 1 or Mastering mode 2, input a digital source with a
sampling rate of 44.1kHz.
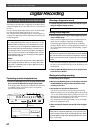
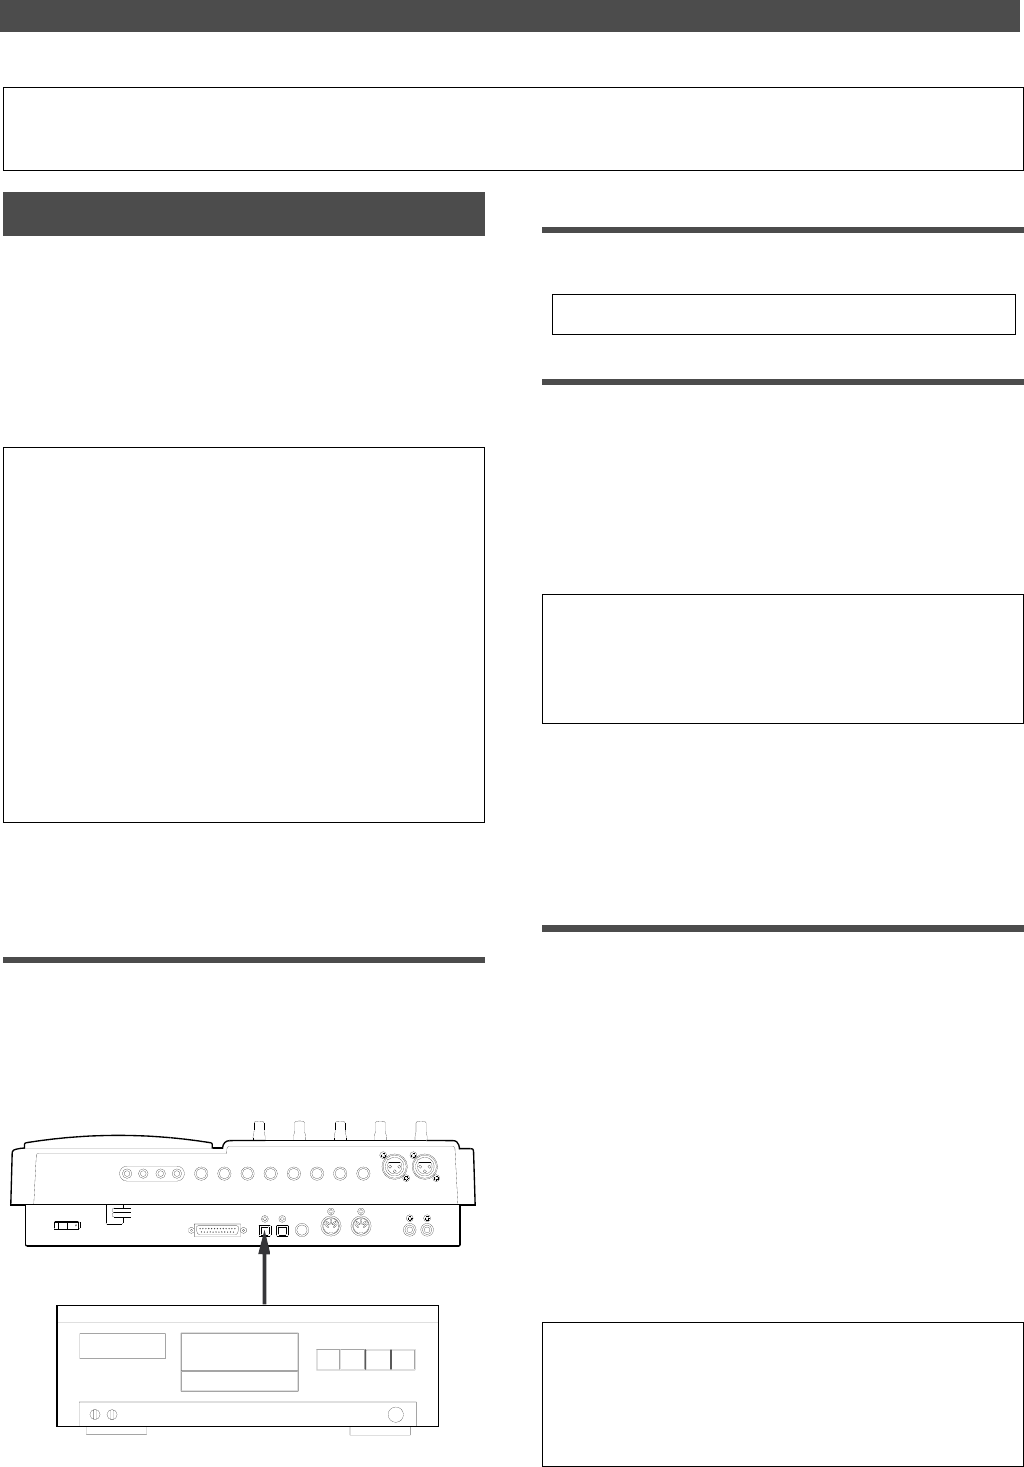
Connecting an external digital device
1. Connect the DATA IN jack of the FD-4 with the OPTICAL OUT
jack of an external digital device using an optical cable.
If the digital device has only the COAXIAL (RCA pin) jack
as a digital output, use a Fostex COP-1 (an optional
optical/coaxial converter).
<Caution>
Do not connect or disconnect an optical cable to or from the DATA IN
jack of the FD-4 while a track is assigned as digital input. Otherwise,
noise may be induced to the FD-4, affecting the connected digital
device.
When you finish setting the parameters in SETUP mode,
be sure to press the EXIT/NO key or the STOP key to exit
SETUP mode.
3. Press the RECORD RACK select key of the assigned track
to set the track to READY.
Starting and quitting recording
1. Locate the top of the Program.
2. Make sure that [DIGITAL] lights up on the display. Hold down
the RECORD button and press the PLAY button to start
recording on the FD-4.
3. Start playback on the external digital device.
You do not need to adjust the recording level during
digital recording. If you are recording data on one of tracks
1–4, set the monitor SELECTOR to [MON] so that you can
monitor the recorded signal via the MON mix section of
the channel that corresponds to the track.
You cannot monitor the signal while you are recording
data on an Additional track.
4. When recording is complete, stop the FD-4 and the digital
device.
<Note>
While a track is assigned for digital input, you cannot use the same
track for analog recording via the corresponding input jack. When
you finish digital recording, set the “Setting digital input tracks” menu
to [L-, r-] (no assign).