


18
En
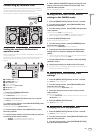
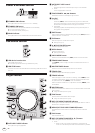
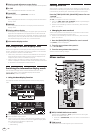
e Playing speed adjustment range display
This indicates the range by which the playing speed can be adjusted.
f A. CUE
This is displayed when the auto cue mode is set.
g QUANTIZE
This is displayed when [QUANTIZE] is turned on.
h INFO
This is displayed when the main unit display is set to the information
display mode.
i BROWSE
This is displayed when the main unit display is set to the browse
display mode.
j Playing address display
This displays a track as a bar graph. The graph lights up from the left
edge when the elapsed time is displayed and turns off from the left
edge when the remaining time is displayed. The entire graphs starts
flashing slowly when only 30 seconds remain to the end of the track,
then starts flashing quickly when only 15 seconds remain.
k Information display section
Switching the browse display mode
There are two types of browse display modes: library browse and folder
browse. The display mode differs according to whether or not rekordbox
library information is stored on the USB device.
— When library information is stored on the USB device: The display is
set to the library browse mode. The music files are displayed in five
categories (artist, album, title, BPM and playlist).
—
When no library information is stored on the USB device: The infor-
mation is displayed in the folder browse mode. The folders and tracks
on the medium are displayed in a tree structure.
Switching the information display mode
The information display section switches between the track name
display, beat display or auto loop/effect display each time the
[INFO(UTILITY)] button is pressed.
Using the beat display function
This displays the beat and playback position of the currently playing
track.
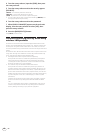
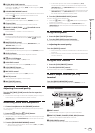
1
1 beat
1 measure
1/2 beat
2
1 Beat display section
2 Auto loop/effect display section
! When the track name display is selected in the information display
mode, it automatically switches to the auto loop/effect display when
one of the following operations is performed:
— Auto beat loop setting
— Effect setting
Setting auto cue
When a track is loaded or the track search operation is performed, the
silent section at the beginning of the track is skipped and the cue point
is automatically set at the point immediately before the sound starts.
Press the [TIME (AUTO CUE, QUANTIZE)] button for over
1 second.
Auto cue is set to on.
[A. CUE] is displayed on the main unit display.
! When the [TIME (AUTO CUE, QUANTIZE)] button is pressed again
for over 1 second, auto cue is set to off.
! The auto cue level setting remains in the memory, even when the
power is turned off.
Changing the auto cue level
The acoustic pressure level identified as a silent section with the auto
cue function can be selected from eight levels.
! The auto cue level setting remains in the memory, even when the
power is turned off.
1 Press the [INFO(UTILITY)] button for over 1 second.
The [UTILITY] screen is displayed.
2 Turn the rotary selector then press it.
Select [A. CUE LEVEL].
3 Turn the rotary selector then press it.
The auto cue level setting changes.
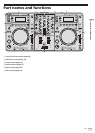
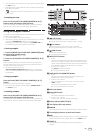
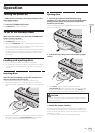
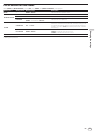
Mixer section
WLAN
CUEMASTER
HEADPHONES
MIXING
EQ
LOWHI
COLOR
LOWHI
BOOTH MONITOR
0
NOISE PITCH
CRUSH FILTER
SOUND COLOR FX
LOW
+9
10
9
8
7
6
5
4
3
2
1
0
10
9
8
7
6
5
4
3
2
1
0
DECK1PHONO1/LINE1
THRU
COLOR
LOWHI
HI
+9
DECK2PHONO2/LINE2
AUX
LEVEL
0
MIC
LEV
EL
0
CH1 CH2
CROSS F.CURVE
AUX
ON/OFF
MIC
ON/OFF
PHONES
CH1 CH2
CH1 CH2MASTER
LEVEL
0
TRIM
+9
HI
+9
MID
+9
LOW
+9
MID
+9
TRIM
+9
MASTER
LEVEL
0
−
USB
STOP
5V 500m
A
7
c
b
8
3
3
2
2
5
4
1 1
6
d
h
g
e
f
9
a
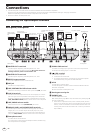
1 DECK, PHONO/LINE selector switch
Used to select the [CH 1] or [CH 2] input source from among the
devices connected to this unit.
! When set to [PHONO/LINE], the mixer section can be used as a
DJ mixer.
2 TRIM control
Adjusts the level of audio signals input in each channel.