


35
En
Additional information
Additional information
Troubleshooting
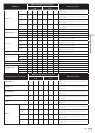
! Incorrect operation is often mistaken for trouble or malfunction. If you think that there is something wrong with this component, check the points
below. Sometimes the trouble may lie in another component. Inspect the other components and electrical appliances being used. If the trouble
cannot be rectified after checking the items below, ask your nearest Pioneer authorized service center or your dealer to carry out repair work.
!
This unit may not operate properly due to static electricity or other external influences. In this case, proper operation may be restored by turning the
power off, waiting 1 minute, then turning the power back on.
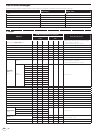
Power supply
Problem Check Remedy
The power is not turned on.
None of the indicators light.
Is the power cord properly connected? Plug in the power cord to an AC outlet. (page 10)
Is the [STANDBY/ON] button for power supply
set to [ON]?
Set the [STANDBY/ON] button for power supply to [ON]. (page 21)
The [STANDBY/ON] indicator flashes
and the power does not turn on.
— Normal operation can sometimes be restored by unplugging the power cord,
waiting at least 1 minute, then plugging the power cord back in. If the symptom
persists, unplug the power cord and request repairs.
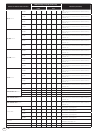
Audio output
Problem Check Remedy
No sound or small sound. Are the [DECK 1, PHONO1/LINE1] and [DECK 2,
PHONO2/LINE2] selector switches set to the
proper positions?
Switch the channel’s input source using the [DECK 1, PHONO1/LINE1] and
[DECK 2, PHONO2/LINE2] selector switches. (Page 22)
Are the [TRIM] control, channel faders, crossfader
and [MASTER LEVEL] control set to the proper
positions?
Set the [TRIM] control, channel faders, crossfader and [MASTER LEVEL] control
to the proper positions. (Page 22)
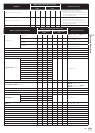
Is the [LINE, PHONO] selector switch on this
unit’s rear panel properly set?
Properly set the [LINE, PHONO] selector switch on this unit’s rear panel accord-
ing to the connected device. (page 10)
Distorted sound. Is the [MASTER LEVEL] control set to the proper
position?
Adjust [MASTER LEVEL] so that the orange indicator on the master level indica-
tor lights at the peak level. (Page 22)
Is the [TRIM] control set to the proper position? Adjust [TRIM] so that the orange indicator on the channel level indicator lights
at the peak level. (Page 22)
Is the [LINE, PHONO] selector switch on this
unit’s rear panel properly set?
Properly set the [LINE, PHONO] selector switch on this unit’s rear panel accord-
ing to the connected device. (page 10)
Is the sound level input to the [MIC] terminal set to
an appropriate level?
Set the [MIC LEVEL] control to the proper position. (page 19)
Is the sound level input to the [AUX IN] terminal
set to an appropriate level?
Set the [AUX LEVEL] control to the proper position. (page 19)
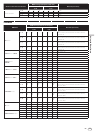
No sound is produced, or sound is
distorted or noisy.
Is this unit placed near a TV? Turn the TV’s power off or install this unit and TV away from each other.
Microphone sound is not output or
volume is low.
Is the [MIC LEVEL] control set to the proper
position?
Set the [MIC LEVEL] control to the proper position. (page 19)
Is the switch on this unit or the microphone
turned off?
Turn the switch on.
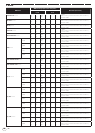
Sound is distorted when an analog
player is connected to this unit’s
[PHONO/LINE] terminals.
Or, lighting of the channel level
indicator does not change even when
the [TRIM] control is turned.
Have you connected an analog player with a built-
in phono equalizer?
For analog players with built-in phono equalizers, use with the [LINE, PHONO]
selector switch on this unit’s rear panel switched to [LINE]. (page 10)
If the analog player with built-in phono equalizer has a PHONO/LINE selector
switch, switch it to PHONO.
Is an audio interface for computers connected
between the analog player and this unit?
If the output of the audio interface for computers is line level, use with the [LINE,
PHONO] selector switch on this unit’s rear panel switched to [LINE]. (page 10)
If the analog player has a PHONO/LINE selector switch, switch it to PHONO.
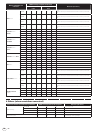
Display
Problem Check Remedy
The playing address display is not
displayed in the remaining time mode.
— When playing files recorded in VBR, it may happen that the set cannot detect the
length of the track immediately and that some time is required for the playing
address display to appear.
The category is not displayed. Is the rekordbox library information stored on the
USB device?
Use a device onto which the library information has been exported from
rekordbox.
Is the USB device write-protected? Cancel the USB device’s write-protection so that this unit can write on it.
Nothing is displayed. Is the auto standby function activated? This unit is shipped with the auto standby function turned on. If you do not want
to use the auto standby function, set [AUTO STANDBY] to [OFF]. (page 24)