


Section 2 – Front Panel controls
06/97 – 1.00 – 2-3
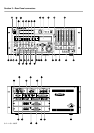
[20] SHTL MON (F 8) key and indicator
When this key is pressed, shuttle monitoring is
enabled (see 7.1.3, “Shuttle monitoring”).
When the
SHIFT
key [24] is pressed, this key
becomes a function key.
[21] REPEAT (F 9) key and indicator
When this key is pressed, playback is repeated
between the two memory locations set by [13] and
[14] (see 8.2.5, “Repeat function” for details).
When the
SHIFT
key [24] is pressed, this key
becomes a function key.
[22] LOC 1 (F 10) key
This key locates the tape to the position set by
MEMO 1
[13].
When the
SHIFT
key [24] is pressed, this key
becomes a function key.
[23] LOC 2 (PRESET) key
This key locates the tape to the position set by
MEMO 2
[14].
When the
SHIFT
key [24] is pressed, this key
allows the assignment of the function keys ([9]
through [13], and [18] through [22]) (see 5.3,
“Assigning menus to function keys”).
[24] SHIFT key and indicator
When this latching key is pressed (the indicator
will flash), keys [9] through [13] and [18] through
[22] become function keys, and key [23] takes on
a new function as a
PRESET
key (see 5.3,
“Assigning menus to function keys”).
[25] CURSOR keys
These keys are used to navigate the cursor through
the menus controlling the DA-98 functions.
When a menu has been selected, the
UP
and
DOWN
keys ( and ) are used to set
the values or select the choices within the menu).
See page 5-1 for details of how to use these keys
in menu operations.
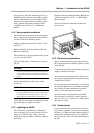
[26] SHUTTLE switch, indicator and
control
When the
SHUTTLE
key is pressed, the indicator
will light. The
SHUTTLE
control will then be
active. Turning the control to the right privides
forward cueing and turning it to the left provides
reverse cueing, similar to “rock and roll” on open-
reel tape decks.
For details, see 8.6, “Shuttle operations”.
[27] ENTER and ESCAPE keys
These keys are used in conjunction with the cursor
keys [25] to go “up and down” the menu
hierarchy.
See page 5-1 for details of how to use these keys
in menu operations.
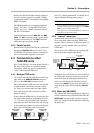
[28] REC FUNCTION switches and
indicators
These eight switches and indicators allow the set-
ting and viewing of the record status on a track-
by-track basis.
When one of these switches is pressed, the appro-
priate indicator will flash, the track is “armed”,
and going into record mode will start recording on
that track. When recording is being carried out on
a track, the track’s indicator will light steadily.
[29] INPUT MONITOR switches and
indicators
These switches allow the monitoring of inputs to
tracks on a track-by-track basis, irrespective of the
current transport status. The appropriate indica-
tor(s) will light when monitoring track input(s)
using these switches.
Note that the function of these switches is con-
nected with the
ALL INPUT
key [18] (page 7-1).
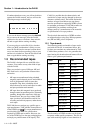
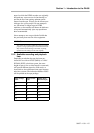
[30] CLOCK switch and indicators
This switch and these indicators allow you to set
and view the system clock. There are three
options:
For full details of external synchronization, see
10, “Operations related to timecode”.
Setting Meaning
INT
The DA-98 will provide its own clock refer-
ence
WORD
The clock will be synchronized to the signal
received at the
WORD SYNC IN
connector
VIDEO
The clock will be synchronized to the signal
received at the
VIDEO
IN
connector