


Section 10 – Operations related to timecode
06/97 – 1.00 – 10-11
the CHASE key is pressed. You must determine
whether the chase mode refers to timecode or to
the DTRS sync, and this is done using the Time
Mode menu (see 10.1.3, “Selecting TC or ABS
timing”). If
is selected, when
CHASE
is
pressed, the machine will enter DTRS sync mode,
but if
is selected, the machine will attempt to
lock to external timecode.
When the DA-98 is in “chase-ready” mode (the
CHASE
indicator is flashing) and timecode is
received at the
TIME CODE IN
connector, the DA-
98 will start to chase the timecode. When it is
locked to the incoming timecode, the
CHASE
indi-
cator will light steadily.
The exact ways in which it chases the timecode
and handles transport functions, etc.are deter-
mined by a number of settings, as described
below:
10.7.2 Setting timecode offset
You may enter a timecode offset for the audio
from the DA-98 to match the audio (or video
sequence) from the timecode master.
As with the machine offset (see 9.3.1, “Setting
machine offset”), you can either set this manually,
entering the numbers, or set it “on-the-fly” by ear.
In either case, once the offset has been entered, it
can then be edited.
The offset can be set to subframe accuracy (100
subframes = 1 frame).
10.7.3 Setting timecode offset from the
menu
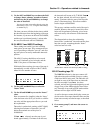
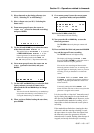
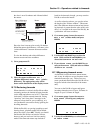
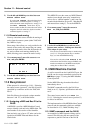
1) Go to menu group 4, move the cursor to
and press
ENTER
:
2) Use the
LEFT
and
RIGHT
keys to select the field
(hours, minutes, seconds, frames or subframes)
and use the
UP
and
DOWN
keys to set the value.
You can use the function keys in the number key
mode (see 5.2.2, “Using the function keys as num-
ber keys”) to enter the offset (and the leading sign)
directly.
If this value is set to anything other than
00:00:00:00.00, the
OFFSET
indicator by the tape
counter will light.
If you move the cursor to the right digit of the sub-
frame field, this will act as a “roll-over” field (i.e.
if you are incrementing the value and it passes 99,
the frame field will increment.
10.7.4 Cancelling timecode offset
When the timecode offset value is set to all zeros,
timecode offset is cancelled and the
OFFSET
indi-
cator goes out.
1) From the
menu
described above, press the
UP
and
DOWN
keys
simultaneously to reset the value.
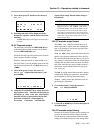
10.7.5 Setting timecode offset on-the-fly
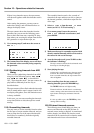
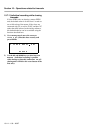
There is a second “invisible field” to the right of
the subframe field (similar to that for machine off-
set settings – (page 9-3)). Moving the cursor to
this field changes the display:
This screen allows you to set the offset by press-
ing the
UP
or the
DOWN
key. When you do this,
the difference between incoming timecode and the
NOTES
• The timecode frame rate used on the DA-98 must match
the frame rate of incoming timecode (see 10.3, “Select-
ing the frame rate”). If they do not match, a warning
message will be shown, and the DA-98 will not chase to
timecode. You can check the frame rate of incoming
timecode (see 10.5.7, “Checking external timecode”)
and of the timecode recorded on the DA-98’s tape (see
10.2.5, “Checking tape TC”
• The timecode used internally by the DA-98 does not
have to be an actual timecode striped tape. Instead,
timecode can by “synthesized” from the ABS subcode
timings, as described in 10.2, “Tape timecode mode”.